Monday, October 29, 2018

Help Your Students Help Themselves- 

3 Accessibility and Differentiation Tools In Schoology

@LisaBerghoff/@MrKimDHS


When you have a class of students, you will inevitably have a wide range of learners on many levels. You will have students who are strong readers and students who struggle. You will have students who are masters at physically organizing their materials, and students who can't hang on to a pencil for more than 5 minutes. You will have kids who are riveted by your class, and those who can barely pay attention long enough to hear the instructions. You get the point, regardless of if your class is labeled "honors" or "regular" or "survey", you are going to have variation and this requires constant differentiation. No two learners are exactly the same and that is part of what makes teaching so challenging and so satisfying at the same time.  When I first began teaching in special education, I can remember trying to give each of my students a version of what they need with old school paper, pencils, and books. It nearly caused me to quit. Once technology became infused with education, I saw that not only was it easier for me to give my students what they need, but I could actually help them access tools on their own. This gave them a sense of independence as learners that I knew would transfer to their other classes and life beyond high school. 
The good news is that with our lms, Schoology, there are built in features that can make both differentiation and accessibility much easier.  

Here are a few of my favorites:

1. Tool Tip

Why? This feature is incredibly helpful for students who struggle with language, need clarification of directions, or might just need some additional information. 

What? Basically, this allows you to add information that will show up when the students hover over a certain piece of text. 

Where? You can add a tool tip to a page, assignment or a test/quiz question. 

How? 
1. Create your page or assignment. 
2. Highlight a section of text and then click the insert content icon. 
3. Select tool tip and write in the definition, hint, or additional information that will show up. 
4. Click the green arrow to confirm. 


2. Grading Groups

Why? Sometimes you may want to give one assignment to a group of students, and a different assignment to another group.

What? This creates groups of students within your course. You can choose to assign to a specific group to differentiate.

Where? You create the grading group in the Members tab on the left menu of your course. You can then assign to a group within an assignment.

How? 
1. Click on Members
2. Click where it says Organize Members Into Grading Groups
3. Name the group and choose the students to be in that group (the students will not see this)
4. In your assignment, click the Individually Assign icon and then type in the name of your group.


3. Attach An Audio/Video File

Why? There are students who benefit from seeing or hearing instructions or information in addition to reading it.

What? You can record an audio or video to attach to your materials. 

Where? On the materials page in an assignment or a new page OR the updates page. 

How? 
1. Create a new assignment or new update. 
2. Click on the microphone icon.
3. Choose audio or video (hint, the first time you do this you will need to click "allow" so Schoology can access your microphone and/or webcam. You may also need to update flash. 
4. Record and save.


There are so many incredible tools that can help our various learners. What are some of your favorites?  Want to learn how to use some of these? Feel free to make an appointment or join me for a lunch and learn.


Tuesday, October 23, 2018

10/23 Schoology Tips and Tricks 2.0
Another Round of Schoology Tips and Tricks

@Themrkim/@LisaBerghoff


It's week 10 and with some real, concrete Schoology experience under our belts, this seems like a good time to learn some new tips and tricks! The following items are solutions to some commonly asked questions and useful features that we've found so far. As always, we really appreciate everyone's patience and enthusiasm as we learn Schoology!

1. How to find grades for students who drop/transfer out of my class?

Course changes happen all the time, and if it happens days, weeks, or even months into the semester, the recipient teacher will need that student's grades. Here's how:

Instructions for the original teacher
  • On your Schoology page, click on "Members" on the left-hand side
  • Then to the right of, "Add Members" click on "Inactive"
  • This will give you a list of all of your students who have been removed from your course
  • To the right of the student's name, there are three colored bars. Click that and it will show their grades

  • You can print the grades the usual way by pressing “Ctrl + P” or you can save it as a PDF. To save it as a PDF, click “Ctrl + P” and change the destination from your actual printer to the “Save as PDF” option.


2. Adding other staff or senior teachers to your Schoology Page

Luckily I still get to teach 1 section of political science, and Lisa Allen and Amy Skonberg round out the rest of the poli sci team. I wanted Lisa and Amy to be able to see my course, calendar, and assignments that I posted. If I had a senior teacher, I would’ve added them as well. Here’s how:

  • On your Schoology page, click on “Members” on the left hand side
  • Once you click, "Add members" a box full of names will appear. Switch from "Township High School District 113" to your building
  • Then type in the name of the teacher or student you would like to add. You can add multiple people at the same time

  • Once added, click on the gear wheel to the right of their name. Then click, "Make Admin"
  • Once you give them admin privileges, go back to the same gear wheel to the right of their name and click on, "Set Section-level role"
  • This gives you the option to give your added teacher/senior access to your class, but controlled access. You obviously wouldn't want senior teachers seeing student grades
Below are the section-level role options. "No grades/ View Materials" would probably be the best option for most cases. That means the added person cannot see or edit any student grades, but they can view your Schoology assignments/discussions/posts.


3. Control what notifications you receive from Schoology.

This can be a daily double for students and staff. The number of e-mails we receive can get overwhelming. Some fun facts: as of March 2018, over 125 billion daily e-mails are sent around the world, and the average worker is responsible for 120 of them. Schoology mercifully gives us complete, granular control over this.

  • At the top right hand corner of your page, click on your name and avatar
  • Clicking on "Settings" will bring you to your main account page.
  • Now click on, "notification." Go down the list and decide for yourself what you think warrants an e-mail notification.

4. Organize your gradebook by categories

It's important to take a holistic look at a student's performance and one way to do that is to organize grading by categories. The all category summary shows you how a student is doing in each grading category . It might be helpful to see how students are doing in formative assessments only relative to their summative ones.

  • In your gradebook, change over from "All materials" to "All category summaries" which will differentiate the grade.
  • The same tab will list your categories and will only show gradebook entries from those specific groups.

Have any other Schoology tips and tricks? Or have any other questions? Leave comments below!

Monday, October 15, 2018

Presenting? 

Try Interacting Instead With Peardeck

I am so fortunate that in my job I get to see many different teachers teach many different students. I love it! You can feel the vibe of a class just by hanging out for a few minutes. Teachers still seem to primarily rely on lecture/presentation style teaching when doing whole class instruction. The overhead projectors are gone and in their place are powerpoint and Google slides presentations. As a student, I often struggled with this type of teaching because I just couldn't sustain attention for long unless I was very interested in the topic. If there was a way for the teacher to have us do something, besides taking notes, that would often help redirect my focus and increase my learning.

There is a fantastic tool, called PearDeck, that works with Google slides, that allows you to input interactive activities within your presentation. I used PearDeck with my class today. They loved it! They said that it would work especially well for social studies, in their opinion. I tried about 4 different question types and was very pleased with the students' level of interaction. I also really liked how simple it was to use for both me and my students. 

Here's how it works:
When you create a Google slides presentation, go ahead and add the PearDeck add on. Once you do that, a sidebar will open up with options for interaction. For example, there is a whole deck dedicated to critical thinking. There are also options for beginning class, during class, or ending class such as bell ringers and exit tickets. Once you create your presentation, including the PearDeck slides, you can click to present in PearDeck. The students will see the access code that you project on the screen and then they can see what you are presenting. You control the presentation, both being projected on the room and on your students' individual screens. When you get to one of the interactive slides, the students can go ahead and type, draw, or whatever you set up for them to do. You can see all of their responses on the teacher dashboard. You can choose to present the responses or just keep them on your laptop screen. 

The simple, 3-step process is:

*Images from PearDeck.com

1. Open PearDeck through the Add Ons menu in Google slides. If you don't already have it, you can click Get Add Ons and search for Pear Deck. You will be prompted to allow PearDeck to run


2. Add interactive slides from the PearDeck library and customize the questions to make them your own. 


3. Click Present With PearDeck to open the interactive lesson. 


You also have the option of adding a question that you can create yourself:

Do you want to give PearDeck and try but aren't sure how to get started? You can check out the PearDeck website. Or, give me a call. I'm happy to work with you on this. Do you have other tools or tricks that you love for getting kids engaged during direct instruction? Post in the comments below.


Tuesday, October 9, 2018

10/9 Keyboard Shortcuts


A Few Keyboard Shortcuts that'll save you time and your sanity!


  @MrKimDHS/ @LisaBerghoff


I'm currently typing this blog on an immense, mechanical keyboard with RGB lights pulsing with, you guessed it, Halloween colors. If you've ever asked yourself before if you need LED lights under each key that responds to your touch, first of all the answer is yes, and second - please do yourself a favor and go out and buy an RGB keyboard. With Microsoft reporting that the average American worker spends 6.5 to 7 hours a day on a computer, your fingers will thank you for the added luxury. 

Until then, try some of these keyboard shortcuts that will save you precious time, as you work on your computer day after week after month after year. 


Recovering accidentally closed windows/tabs on your internet browser.


Ctrl + Shift + T (Windows)
Shift + Cmd + T (Mac)

If you're like me, at the end of the day you will anywhere between 10 and 20 tabs open on your internet browser. Ever accidentally close the wrong tab? Or close a window and realize too late that you still need it? To recover press the "control" and "shift" button at the same time. Then press "T" as many times as you need to recover your closed tabs. It will recover them in the order that you closed them. On Chrome, this will also work after a full restart of your computer. Ctrl + Shift + T will open all of your tabs before you restarted your computer!


Extending your desktop through a projector


Windows + P (Windows)
...No shortcut for Mac

Showing a movie in class using your laptop, but still want to be able do something on your own screen? Pressing the Windows button and "P" gives you the option of having two screens: one on your laptop, and another on the projector. After extending your screen, click and drag over the window you wish to be shown to the class.


Copy/Pasting without formatting


Control + Shift + V (Windows)
Cmd + Shift + V (Mac)

Ever copy and paste text, only to find that the text you've copied over is a different font, color, size than what you're working on? Copy your text the normal way by pressing "Control + C" or right click to copy. But when you go to past, hold down the "Shift" button and it'll paste the information with the same formatting as your destination text. 


Quickly minimizing your windows


Windows + D (Windows)
Cmd + H (Mac)

As educators, we are privy to sometimes sensitive information on our computers. We have to be careful with e-mails and student grades. If you have something up on the projector, or a student comes up near your laptop, Windows + D will quickly minimize all windows on your screen and will take you to your wallpaper. If you press Windows + D again soon enough, all of your windows will come back up. 

You do not have to memorize all of these shortcuts at once! Write your favorite shortcuts on a sticky note and post it on your desk, and after a few weeks, it'll be like second nature. Have any other awesome keyboard shortcuts to share? Or need any RBG mechanical keyboard suggestions? Post below!

Monday, October 1, 2018

Maximize Engagement With Slido


@LisaBerghoff/@MrKimDHS


How do you know when your students are engaged?  This is a question that I often ask teachers and I get a wide variety of answers. Engagement is a little bit of a unicorn. You know when it's there but it's hard to pin down. Often, compliance gets confused with engagement. If the students are quiet, looking at you, and following directions, you might assume they are engaged. Look up engagement in the dictionary (or the digital equivalent: Mirriam-Webster.com) and you will find many definitions. When it comes to learning, the following seems most appropriate.

Establish a meaningful contact or connection with. 

How do we know if our students are establishing meaningful contact or connections with what they are learning? One way is by having them do something. Ask them a question that goes beyond recall, have them analyze, discuss, debate, create, and explore. This becomes more complex depending on the course content, the number of sections you are teaching, and the level of involvement you want the students to have. This is where tools come in. There are lots of ways to incorporate various tools to establish or assess levels of engagement. One of my new favorites is called sli.do

Sli.do is an "audience interaction" tool that involves both polling and Q&A features. It's easy to set up, the basic version is free, and it allows for all of your students to interact in a much less risky way than raising a hand.

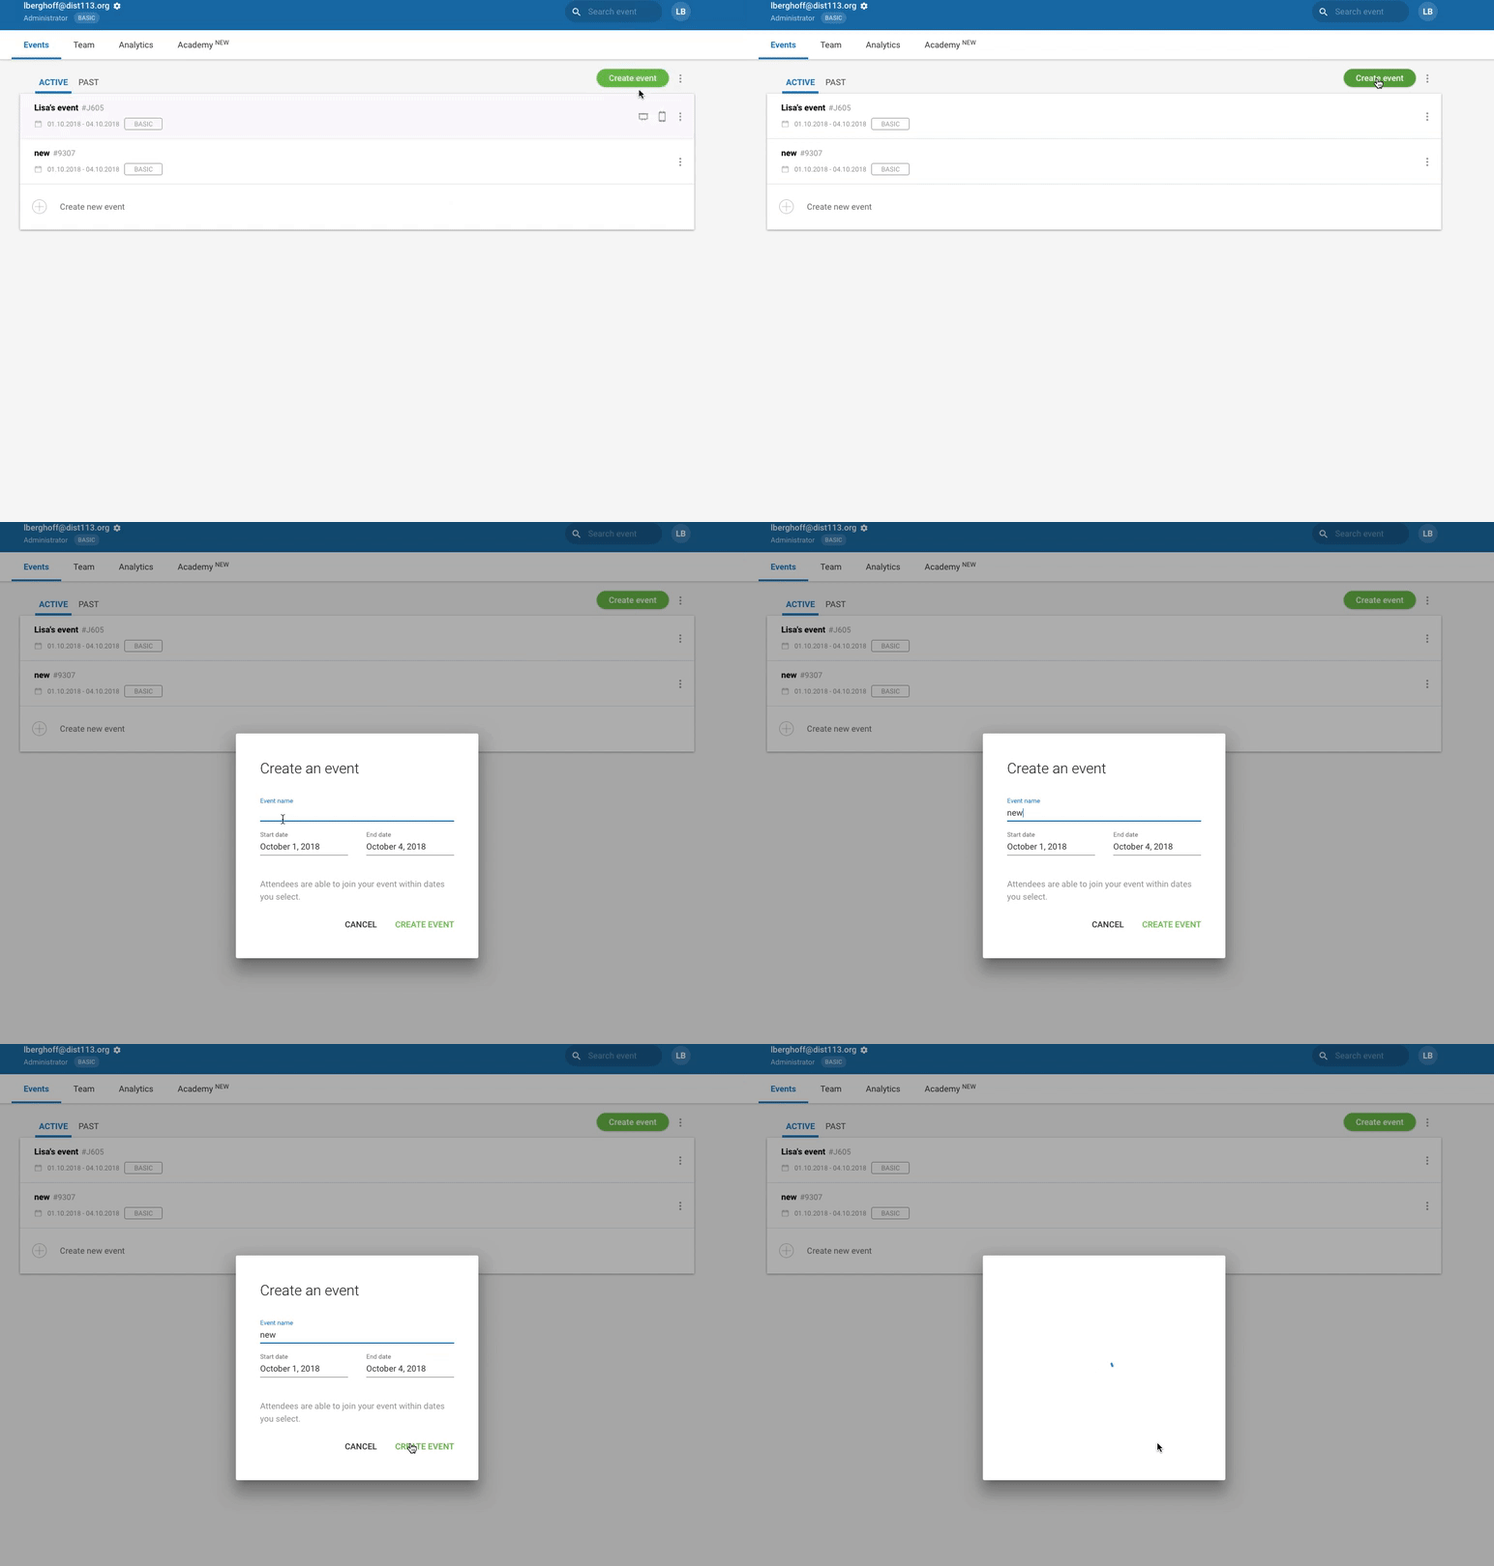
Here's how it works:
1. Go to sli.do and set up your account. You can use your school Google account. 
2. Click on Create Event, name your event, choose the start and end dates and times,  and then click Create Event in the box.
Image from Gyazo

3. You then have 3 options. You can crowdsource questions from the class, you can create a poll, or you can browse how others are using sli.do to get some inspiration. The polling feature is my favorite. I love that I can ask a question, have my students respond, and then sli.do puts their responses into a word cloud which I can use later.

4. Once you have set up what you want to do, you have your students go to sli.do.com and give them the code that is associated with your event. When you are presenting, the code is displayed in large font to make it easier for your students to join. They can use any device, and their responses will show up on your end. You can choose to display your poll or questions in present mode so everyone can see.

I asked my peer mentoring students to think of someone who inspires them and then write down the qualities of that person. Here's what they came up with.


5. After you are done, you can click on the analytics tab to see how many students were engaged and in what ways.


It's great to try using new tools to keep things novel. Sli.do is a simple way to encourage engagement and move beyond compliance in the classroom.
What tools do you love to maximize engagement?
Post in the comments section below.
Want some help setting up Sli.do for the first time? Just ask! I'm happy to walk you through it.