Tuesday, November 27, 2018

Presenting? 


Make It Accessible With Closed Captioning For Google Slides.


I am always thinking about access for our students. One of the main ideas behind Universal Design for Learning is removing barriers for students to maximize learning. Those barriers can come in many forms and some are easier to spot than others. For example, finding what motivates a student to keep at a task even when faced with negative results can be extremely challenging. Students who struggle with reading because of a learning disability or a language barrier can also be tricky because our system of learning is language based. I'm excited about today's free tech tool because this simple tool can help many students in different ways. 

Many of our teachers use a lecture format of teaching. They project a presentation on the board and they talk. This can be problematic for students who have hearing impairments,struggle to understand oral language,  struggle to pay attention, or just to keep up. 

In an ongoing effort to make Google products more accessible to greater numbers of users, there is now a feature in the present mode of Google slides that will generate closed captioning while you are speaking. 

Here's how it works:
1. Open a google slides presentation
2. Click Present in the upper right corner
3. The present tools will open at the bottom of your screen, click Captions

A bar will open on your screen and will begin typing what you say!


But wait, you can take it one step further...
Give your presentation with the closed captioning on and screencast it using Loom. Now you have a video recording of your presentation with closed captioning built in!

This could be valuable for our students who benefit from multiple input modalities. They can see your images, hear you talking, and see the text on the screen all at once. Use of this tool can potentially remove barriers for many of our students.

Here is a 90 second video showing you how this works:


Tuesday, November 20, 2018


Two things are coming (besides Winter): final exams and my first child. In anticipation of my wife and I basically becoming shut-ins with no professional communications to the outside world, we better cover some end-of-the-semester Schoology tips before the last push!


Make sure your final exam/project/paper exists in your gradebook

So the first thing to do is to find out if you've created a final exam grading period. If your final exam exists outside of your running "semester grade," you'll have to create a grading period. So for example, my semester grade is made up of "class work" and "papers and projects." These two categories make up 80% of the final grade, while my final makes up the remaining 20%. If none of that makes sense, take a look at the breakdown below:


To do this:

  • Click on the “Gradebook” tab and create an assignment that’ll be designated as your final.
  • Change the grading period to “Final/Midterm Material Grades”
  • Click on the Plus Sign at the top right, and click on “Add Grade Column.” 
  • Name your final and set the points.
  • Then click on the "Gradebook Setup" tab to change the percentage weights.
  • You can change the S1-DHS/HPHS from 100 to accommodate for the final

Final Grade Scales

Schoology's scale system isn't immediately intuitive so we'll have to make a distinction between assignment scales, and final grade scales. In the gradebook setup page, scales show up twice. The scale choice on the top right is for individual assignments. The scale choices under "Final Grade Settings" will be where you decide to round final grades or choose a pass/fail scale. 


The distinction between "THSD 113 Rounded .5" and Schoology's "Round Period/Final Grades" is important:
  • THSD 113 Rounded .5 will round scores up to the nearest percentage. So an 89.6 will stay an 89.6, but it will count as an A-.
  • Round Period Grades will turn an 89.6 into a 90.0.
  • Teachers will also have the option to assign final grade values into Infinite Campus at the end of the grading period. 
Also important: Do not use the gradebook scale, "Numeric" as it will cause issues when the grades sync over to Infinite Campus. Failing grades will be relabeled from an "F" to the much scarier "H."

Course Override Column

Enabling the course override column gives you the ability to manually override all student scores. It will you give unilateral control over what percentage your students receives in your course, regardless of the calculated score. This can be useful for manually curving final scores. 


Have any other end-of-the-semester questions or concerns? Comment below!


Tuesday, November 13, 2018


It's All About The Video!


I had the most incredible experience about 2 weeks ago. My husband and I fixed my oven. Let me repeat that. My. Husband. And. I. Fixed. My. Oven. We actually looked up what was going on, found the part, found a place that would allow us to order the part, and then we fixed it. How were we able to fix my fancy shmancy oven without scheduling a service call and spending hundreds of dollars?
One word: Video
Yep, we looked it up on YouTube. (special thanks to Appliance Part Pros)  This will probably not surprise many of you. There are lots of stories of people watching YouTube videos as a means to learn something new. So why not bring some of this video magic to the classroom? Video recording and screencasting can be time consuming and complicated if you don't have the right equipment or know what you're doing, right? Actually, there are some very good and very easy to use tools available to you right now that can help you create fantastic screen-casted lessons in no time.

Today I'm happy to introduce you to Loom. This is a free screen recorder that gives you options. Don't want to see yourself in the video? No problem, you can just record what is on your screen and your voice. There is no watermark, like on some other screen recorders, and there are several easy options for sharing your video. You can download it, email it, get a link, or push it to social media.

Hold on, are you thinking that you would love your students to make their own videos? Brilliant! Loom is chromebook friendly and your students sign in with their Google account.

Loom has a chrome extension so all you need to do is grab it from the Chrome Webstore and you will be ready to start recording.

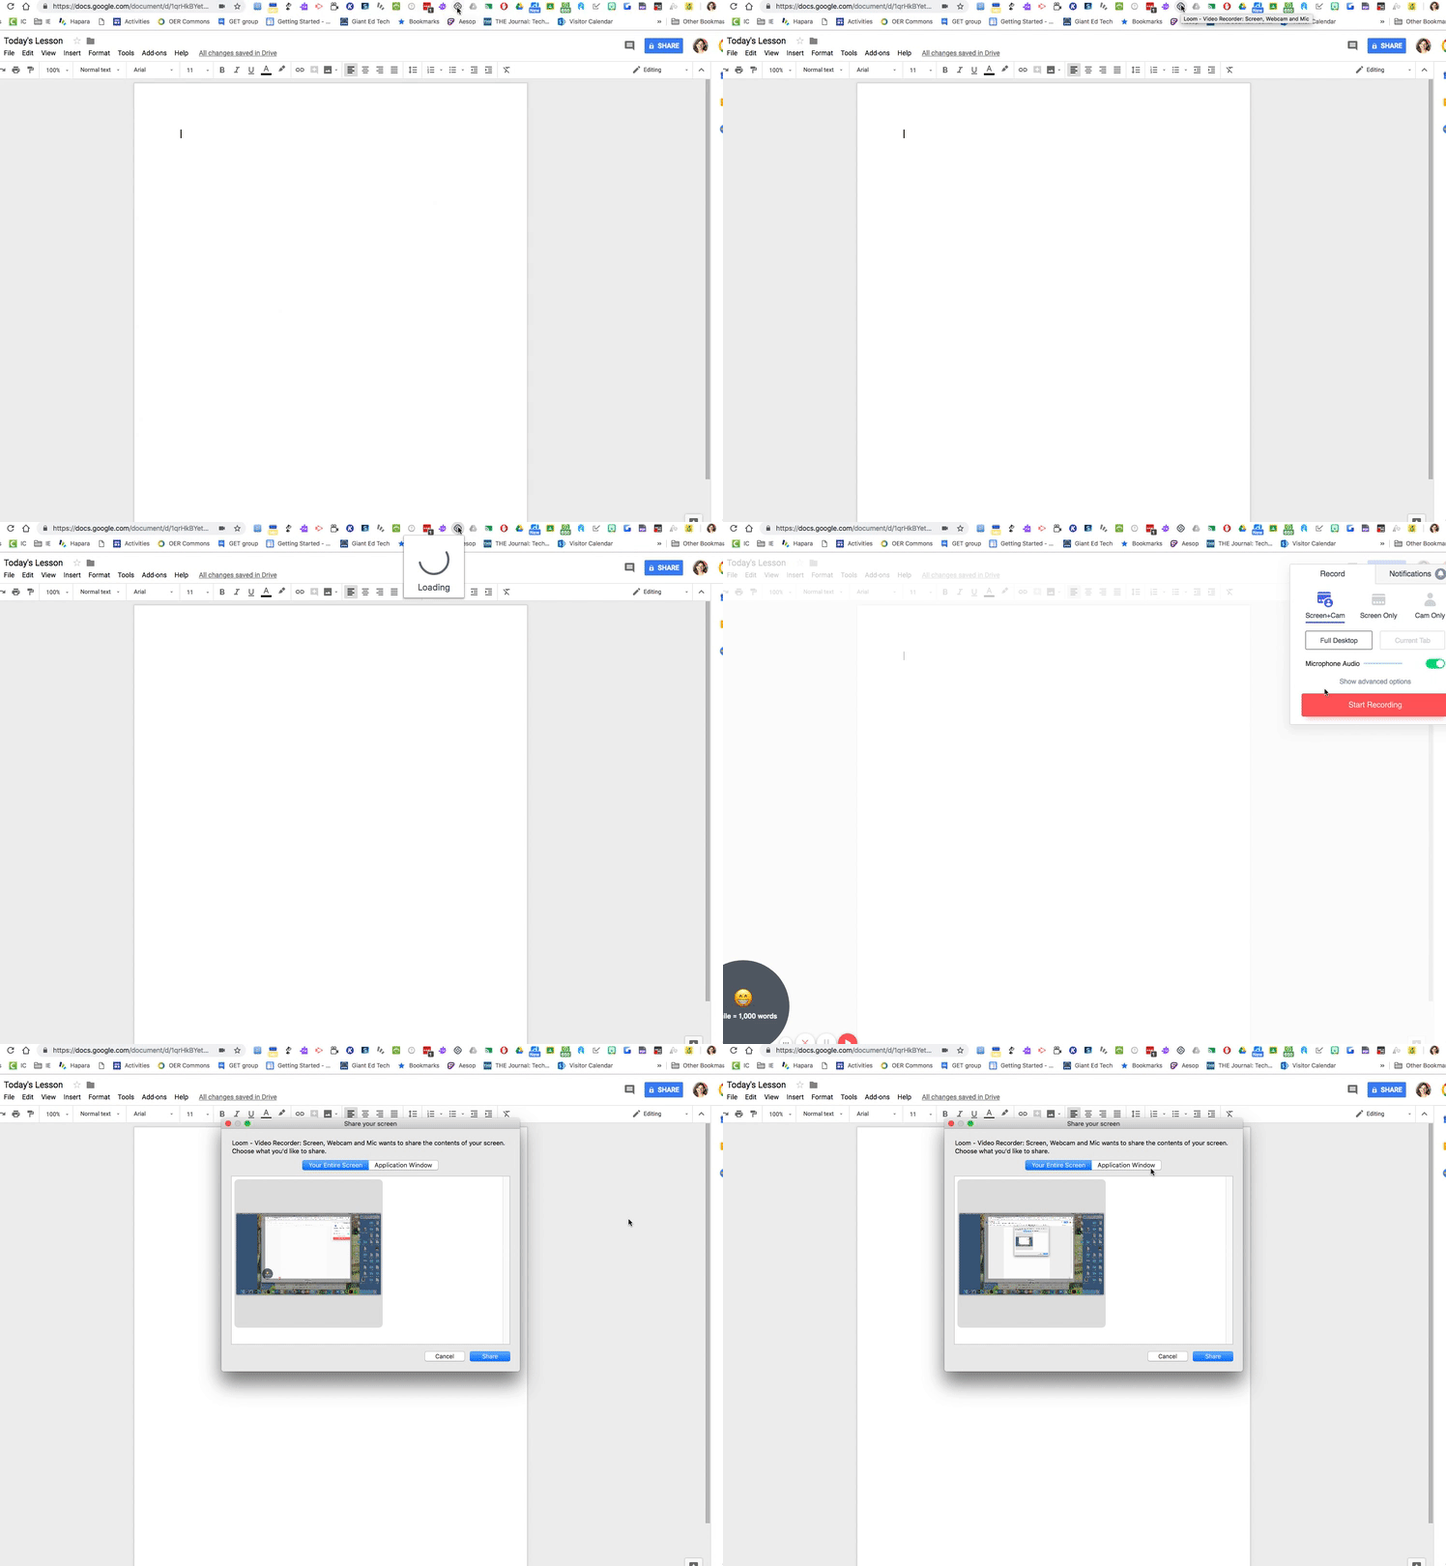
Step 1: Install the Loom extension from the chrome web store.
Step 2: Click the extension and click Start Recording.
Step 3: Choose which window you want to screencast.
Step 4: Record and click the green checkmark when you are done.
Step 5: Share via the link, email, twitter, or embed using html code.


Image from Gyazo


Whether you are flipping a lesson, creating a review, recording a tutorial, having your students give feedback, or create a video to demonstrate their level of mastery, Loom is going to be one of your new go-to tools in your toolbox.

How else do you use video in the classroom? Post below.


Tuesday, November 6, 2018

11/5 - Improving Student Communications with Google Products

Improving Student Communications with Google Products

@LisaBerghoff/@MrKimDHS


As mentioned earlier this year in a blog post about the SAMR model, its creator, Dr. Ruben Puentedura, is the real deal when it comes to innovation and wisdom in instructional technology and education. He's identified some complex challenges impeding the adoption of educational technology, and one such challenge is the ability to scale teaching innovations. Here's what I mean by scaling innovation:

Amazon has these wonderfully active factory floors where giant, roomba-like robots zip and zoom in perfect robotic harmony to move about hundreds of thousands of our impulse Amazon Prime purchases. While some jobs were unfortunately made obsolete, the efficiency of this system is crucial to support both the staggering growth of the Amazon empire, and our obsessive need to have [insert random household item here] delivered to our doors in two days for free! 

These efficient little machines are innovations that can be easily scaled. What works for one Amazon factory works for ALL Amazon factories. Unfortunately our classroom innovations do not always scale. Beneficial apps or digital resources that work for one class may not work for another class for various reasons like student age, course content, ability, instructor, and unfortunately financial support. 

This is what creates such value in tools like Gmail, Docs, Sheets, Slides, and other G Suite applications. These (relatively) free tech tools offer so much diverse utility to help establish digital equity and scale teaching innovations. (Disclaimer: I do not work for Google, nor do I get paid to advertise their products...but I am willing to. Call me Sundar!)

So on to the stuff! Heavily inspired by Vernon Hills High School's tech coaches, here are some simple ways to develop student communication with Google:

Student to Parents - Weekly E-mails

Encourage students to keep parents in the loop with a simple weekly/bi-weekly message. "Feedback Fridays" can be a quick 5 minute routine built into your curriculum. 


Student to Student - Class Backchannel

Create a Google Doc where students can communicate with each other during an activity in a non-intrusive or disruptive way.

Student to Teacher - FAQ Page

Ask students to contribute to a Frequently Asked Question doc or form. For individual projects or papers, create a Google Doc where students can add important questions. Students can initial questions they would like to be answered. 


Have other ideas for developing student communication skills? Post below!