Showing posts sorted by relevance for query remind. Sort by date Show all posts

Tuesday, April 2, 2024

Communicate With Students And Families 

Using Remind


@LisaBerghoff

With the wide range of ways we get our information, texting seems to be at the top of the preferred list for both students and parents. It makes sense because it is fast and easy and text messages tend to be short and to the point. If you are sending lengthy emails, chances are, they are not being read carefully. While this may be frustrating, it can also be liberating. You don't need to craft long email messages, hooray! And you don't need to be stumped by how to send text messages safely because we have Remind, a communication platform designed to reach students and families that is approved by our district for educator use.

What Is Remind?
Remind is a communication platform that gives you the ability to communicate solely by text with parents, teachers, and students without giving them your personal phone number. You can also adjust the settings so students can text you back in a district approved environment. Since we have a district account, Remind automatically creates classes based on your Infinite Campus roster so there is no need to give students a code to join. Yes, there is an app, but it is not necessary to have the app to receive messages. Everyone can customize their notification preferences to determine how they want to receive messages. 

How Do I Use Remind?
Remind can be accessed from your computer or your phone. It's a good idea to start on your computer. 
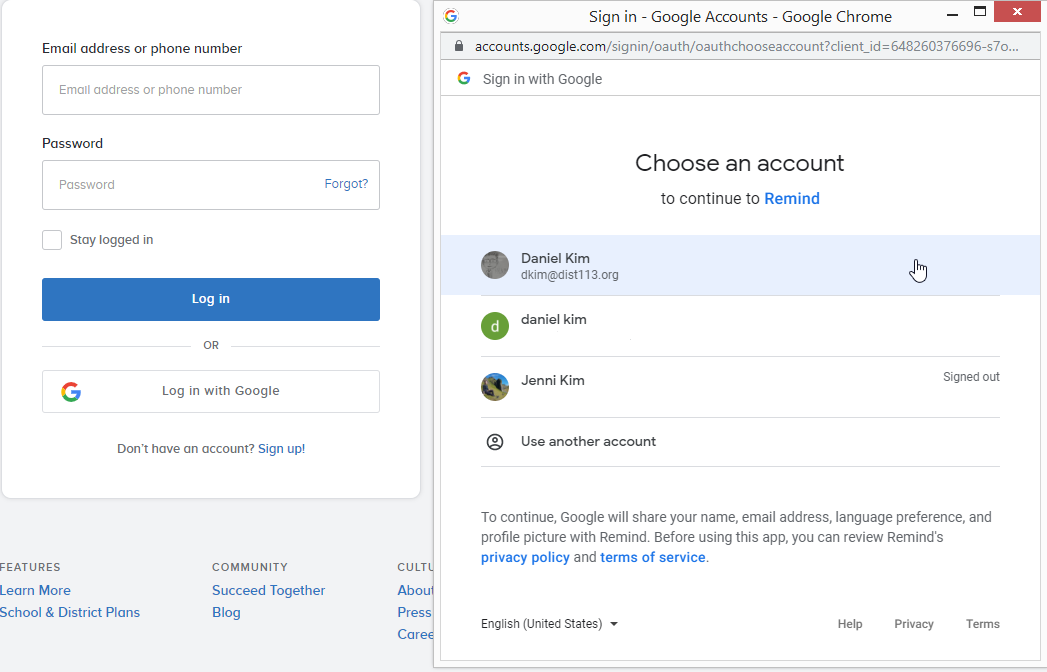
1. Go to Remind.com and log in using your school Google account.
2. From the dashboard, choose a class and click "New New Message" 
3. Select or search a class or a specific person and click continue
4. Type your message at the bottom and click send. 
You can also schedule your messages, add content such as photos and videos,  and translate to other languages. 


Types of messages:
Announcement: These messages can be sent at the class level and allow you to send something to everyone in the class, or multiple classes, at the same time. Even though the message is being sent to the entire class, replies will only go to you.
Role-Based Messaging: You can select specific roles to receive your messages, like students and parents. Just like with a class announcement, only you will see the replies.  

Let's take a look at the Remind dashboard from the computer. As you can see, you have the list of classes that you own followed by the list of classes you have joined down the left side of the screen. At the top, you can see all messages sent, files, the list of people in the class, any calls that were made, and the settings for that class. It is in the class settings where you can see the class code to join, as well as the class settings for visibility and messaging options. 


To adjust your notification settings, click your name in the upper left and then click on Account Settings and then Notification Preferences. This is where you can decide if you want text messages sent to your phone so you don't need to use the app. The choice is yours to make.

Want to know more? You can check out the Remind Learning Center where there are articles and short "courses" you can take to learn more about how to get the most out of your Remind account. Just click on your name and then click "Learning Center".

Want some help getting up and running with Remind? Let me know. I'm always happy to lend a hand. 


Tuesday, September 13, 2022


Remind: THE Communication Tool for School

@LisaBerghoff/@MrKimDHS


This is an updated blog from 2019 when we first got a district license for Remind. It has been a point of emphasis that any communication between staff, students, athletes, or parent/guardians should only be through district-approved formats (Gmail, Schoology, Remind). Luckily, remind is just as simple and easy to use as it was in 2019 with a few minor changes.


1. Logging On

To enjoy the premium features through our district license, log in here using your Google sign in. 
If you've been previously using a personal account, you'll have to switch over to your district email.


2. Student Onboarding (It's already done....sort of)

Once logged in you'll see that through some Infinite Campus - Remind integration magic, all of your courses have automatically been uploaded to your Remind site. Not only are your courses already created, but your students have also been directly added using their IC data. Two caveats:
  • Parents and Guardian information was also added to your Remind classes. In order to send a message to JUST your students, you can filter just the students


  • And if you have students that are missing, it means that they do not have a cellphone registered with the school.
 To add missing or new students to your remind class, give them the Class Code that begins with an "@" sign, and is directly under your course name. Or you can manually add them using the "Add People" option on the top right corner of your page.

3. Sending Messages

Remember, whether you're sending a direct message to a few students/athletes, or an announcement to the whole class/team, make sure you are filtering your intended audience. You can type in an individual student, or filter a group. (Ignore SIS Link and Grade)


This is also where Remind has made some strides in the messaging department. In addition to text messaging, Remind has teamed up with Google Drive, Quizlet, OneDrive, Flipgrid, and a few other apps to beef up your messaging ability. Now you can attach different varieties of files and videos with your Remind message.


Also find that Remind can translate your message into over 50 different languages! 

As usual, you can schedule your messages ahead of time to help with organization and planning.

Questions? Comment below!  

Monday, September 9, 2019


Remind: we have a district license? We sure do. 

@LisaBerghoff/@MrKimDHS

Unbeknownst to most non-power users of Remind, last year telecommunications company, Verizon Wireless was threatening to impose new texting fees on Remind users in an effort to control and reduce spam messages. This would have effectively shut down relatively tiny app companies like Remind who offer mostly free services. An interesting online campaign (#ReverseTheFee) made up of educators, parents, and students, as well as intense negotiations between eDavid and eGoliath, ended with a win for the little guys and the service is largely unchanged.

And now: we have a district license! Here's how to take advantage


1. Logging On

To enjoy the premium features through our district license, log in here using your Google sign in. 
If you've been previously using a personal account, you'll have to switch over to your district email.


2. Student Onboarding (It's already done!)

Once logged in you'll see that through some Infinite Campus - Remind integration magic, all of your courses have automatically been uploaded to your Remind site. Not only are your courses already created, your students have also been directly added using their IC data. (although it might be a good time to audit your student drops and transfers) To add new students, give them the Class Code that begins with an "@" sign, and is directly under your course name. 


3. Sending Messages

This is where Remind has made some strides in the messaging department. In addition to text messaging, Remind has teamed up with Google Drive, Quizlet, OneDrive, Flipgrid, and a few other apps to beef up your messaging ability. Now you can attach different varieties of files and videos with your Remind message.


Also find that Remind can translate your message into over 50 different languages! 

As usual, you can schedule your messages ahead of time to help with organization and planning.
You can also have some granular control over who you're sending your messages to. You can send a single message to all of your courses, just your homerooms, and even specific groups of people within your courses.


Thank you to the real heroes - the myriad internet Twitter warriors who tirelessly tweeted and retweeted #ReverseTheFee, and forced the evil telecommunications conglomerate to concede. 

Questions? Comment below!  

Monday, December 14, 2020

2020 Year In Review

Spoiler Alert: It's Not All Bad! 

@LisaBerghoff/@MrKimDHS/@JoeTaylorDHS


December is a funny time for educators. To me, New Years Day is in August, when school starts. That's when I make my resolutions and set my intentions for the new school year. December just means we're closing out one semester and getting ready to start another. However, I do love all of the year in review lists. December is a wonderful time to reflect on what the calendar year has brought us (insert expletive of your choice here) and also to dream about what's to come. I took a look at my December posts from the past few years just to remember how this goes. I typically do a round up of the most used tools or the most viewed posts and then make some predictions for the future.  This post, like this year, looks a little different. Instead of just focusing on tools I am going to highlight the capabilities that we have embraced during this crazy time. I hope that when you read this you will choose to  appreciate all of your accomplishments. There has been more growth and learning from our district staff than in any of the 25 years I have seen before. I also hope you will look at this list and perhaps think "Oh, right! Maybe I will  try that next semester."

Before we get to my list, every year Google puts out a short video that is the Year In Search. They do a really beautiful job of putting together the most searched items and videos.  Take a look at this year's Year In Search by Google. I'm thinking this could spark some interesting discussions with students. 


Also, New York Times has their 2020 In Photos. This is another great potential classroom resource.


And now it's time for my list. I usually look over the archives to see what the FTT posts focused on throughout the year. This year I am instead going to share the top 5 capabilities that made the grade for 2020.  I am hopeful that even in a post-covid learning environment, we will continue to take advantage of these capabilities as they benefit students, even when we are learning in person. Which will happen again someday, I promise. 
Here they are, in no particular order.

1. Screencasting for Instruction

We got a premium license for Screencastify this year and wow are we putting that little extension to work! We have a new understanding about using video as a learning tool. We know that for many students, the ability to re-watch, pause, and watch when the time is right for them is so important. We are also using recordings of Zoom or Google Meet calls and recording videos within Schoology.

2. Using Our LMS. For Real.

We really have been putting Schoology through its paces in these last 9 months. Technology is great, and needed, but at the end of the day the machine is only as good as what we tell it to do. We have been learning best practices for how to organize our materials in ways that makes it easy for students to find and access what they need. The shift from "what will make my life easier" to "what is best for my students" has led us to make decisions that are making big differences for students. When our materials are organized in a clear way that is well communicated, our students are less frustrated and more likely to engage with the materials.  Using Schoology as a true hub for digital learning has helped so many of our students who struggle even when we are in the building. 

3. Communication Is Key

Schoology updates, Remind texts, Google Chat messages, Zoom and Google Meet in-meeting chats, email, and Google groups are all ways we are using to communicate with students, parents, and each other. Sometimes it works better than others and we are constantly searching for the best way to get our messages across. We are learning that taking a multi-prong approach to communicating gets better results than just using one channel or only communicating verbally. We have also learned about the power of visuals when we are communicating and Canva and Google drawings are the most-loved tools for creating those images. 

4. Novelty Wins

We're tired. Students are tired. We are looking at screens way longer than we should and we are typing millions of documents. However, utilizing tools like Peardeck, Padlet, Edpuzzle, and Flippity can keep our students interested and engaged. Been there done that? Take another look. Teachers everywhere are using these tools in so many different ways. We are leveling up our engagement plans to keep students interested and on their toes. 

5. The Little Things Matter- Tips and Tricks That We Love

Our brains are so interesting. I could spend all day at a conference, learn a hundred new things, take notes on 50 of them, share 10 with my colleagues, but only use 2. Since we've been glued to our computers for so many months, we have all embraced those little tips and tricks that make us more efficient. One of my most favorite things is when I get an email from a staff member sharing a new trick that they learned. I am always learning and it's been so much fun to have my nerdy enthusiasm get matched when sharing things like Chrome tab groups, scheduling messages in gmail, setting up filters in gmail, using Google keep within Google calendar, using the assign feature in Google docs comments and more. 

I could go on but I won't. We will not be sad to say goodbye to 2020. However, I am hopeful that we can take all that we have learned and use it moving forward. I am also hopeful that we can celebrate how much progress we have made and continue to not settle for just doing things the way we've always done them. I am generally an optimist and an overall positive person. There have been times this year that have been beyond challenging but there have also been glimmers of excitement and pride when we have figured things out together.

And now, let's bring on 2021!


Monday, April 17, 2023


Mix It Up With Different Question Types In Schoology Assessments


@LisaBerghoff/@MrKimDHS


 It is getting to be that time of year when we focus on end of the year assessments. The whole notion of "show us what you know" often is in direct opposition to teachers' needing a quick way to grade because we want to get that grade book signed sealed and delivered in time for us to go on summer break. Would I ideally like to sit with every single student and have them go through their growth and progress on all of our learning targets? Absolutely. Unfortunately our schedule does not allow for that and so we are forced into other means of assessing student learning. According to Rick Stiggins, high quality assessment must satisfy five specific quality standards: 1. Clear Targets, 2. Focused Purpose, 3. Proper Method, 4. Sound Sampling, and 5. Accurate Assessment Free Of Bias and Distortion. 

As you are crafting your summative assessments, I thought it would be helpful to bring back into focus some of the assessment features that can be found baked into Schoology, our learning management system.  These features help customize your assessments to go beyond the typical multiple choice and true/false test. There are also lots of options within the setup that can help personalize the experience so you can get the best out of your students. As we know from the TPACK framework, many parts need to come together in order to best integrate technology in our classrooms. With your knowledge of the content and pedagogy combined with how well you know your students, you can utilize technology to effectively assess your students in a way that hits all five of Rick Stiggins' benchmarks for high quality assessments. 

Let's Get Into It:

The Setup-

When you click to add an assessment to your class, you will see the instructions box on the setup page. This box is often overlooked and I would encourage you to use it. Here, you have a rich text editor menu that allows you to add images or other media, links, and tables. You can also bold, highlight, and change the color of your fonts in order to draw attention to specific text. You can choose how you want to set the tone for your assessment. This is a spot where you can remind students of often missed details, and offer words of encouragement.

In the assessment toolbar you can allow students to flag questions so they can go back and review them before they submit. You can also allow them to eliminate answer choices if you do have multiple choice questions on your test.

Question Types-

There are 18 different types of assessment questions you can choose from. I am going to highlight the 5 that I think are most interactive and get kids to demonstrate their learning in different ways. 

1. Label Image

Upload an image and have your students label it by dragging and dropping from a list of potential answers. This can be a wonderful option for timelines, labeling models, cycles, or systems, describing parts of a work of art, or parts of an equation. Here are detailed instructions for using Label Image questions in Schoology, including how to align learning objectives. 


2. Highlight Hotspot

Upload an image and have your students identify an area or region that is determined by you. Use this option with maps, geometric shapes, data charts, scientific diagrams,vocabulary questions, and more. Here is an example using basic Spanish vocabulary. Here are instructions for using Highlight Hotspot. 


3. Chart

This question type enables students to review, create, or manipulate different kinds of charts in response to a question.  I actually recently saw a teacher use this as a self reflection tool which really appealed to me. I created one for an instrumental performance. I uploaded an image of the rubric so the students can refer to it. Then, I set the parameters so students can interact with the chart. They can assess themselves using the chart and then write or record a reflection explaining why they chose what they did. You can see lots of ways this would apply to your class. Here are detailed instructions for using the Chart question type. 


4. Highlight Image

This question type offers so much more than the name implies. Upload an image and your students are given multiple color options to highlight the image. But they don't need to only highlight. You can use this as a drawing tool as well. Since many of our students have touch screen chromebooks, this can be a fantastic option for marking text, circling or drawing arrows for vocabulary. My example below shows how to use the Highlight Image question for graphing in math or science. The image that I uploaded is just a basic graph. Once you create one question of this type, you can easily duplicate it and just change the equations.


5. Audio/Video 

I often have students who don't do well on a test or a quiz just come in and tell me what they know. It's remarkable to see the difference when they can just talk to me. While I can't do that with every student in person, I can have them respond to an audio or video question. You can upload an image or other media to add to your question prompt. The students then click to record their audio or video, depending on the question type. It's very easy to listen or watch once they submit.


Are you ready to start exploring the various options within Schoology assessments? Want some help getting started? Send an email and I'm happy to partner with you!


Monday, November 7, 2022

Flashcard Factory

Flashcard Factory

Make Flashcards For With Your Students

@LisaBerghoff/@MrKimDHS


As we learn more and more about cognitive processing styles and the ways to differentiate in order to offer options for all learners, it is important to remember to include students on the creation of learning materials. Too often, we get stuck in the mode of having students create as a way of demonstrating their learning at what we consider an endpoint. There are so many opportunities to include students in creating at the beginning as well as the middle of their learning. Why not include students in hands on experiences that let them be in charge right from the start? Fortunately, we have digital tools that can help make the learning pit interactive and maybe even fun.

Pear Deck's Flashcard Factory is not new, but I think we often forget it's there or think it's not for us. I'm here to remind you and convince you that it is for you and your students.

Vocabulary can be a barrier or an open door to learning. Using Flashcard Factory at the beginning or the middle of a unit can help flip the switch from barrier to open doorway.

 There are a few things I love about Flashcard Factory. Here they are in no particular order.

1. Students are involved in creating their own study set of flashcards

2. It requires drawing in addition to writing 

3. It is collaborative and encourages students to lean in and work together

4. The class gets to look at and make decisions about whether or not a card makes it into the final deck

5. The graphics are super cute and fun

6. This is appropriate for any content area and any level

7. Seeing what the students come up with can be great formative data


Here's how it works:

1. Go to PearDeck.com and sign in using your school Google credentials.

2. Click Flashcard Factory.

3. Create your list or import a list. There is a connection to Miriam Webster if you want to auto-add definitions. 

4. Click Play Flashcard Factory and present the join code to your students. They will go to joinpd.com and enter the code.

5. Once your students have all signed on, click Clock In. It will automatically put your students in pairs and on teams. There are 2 teams: Day Shift and Night Shift. If you have an odd number of students, they can work on their own and the game will adjust for them. You can click to shuffle the teams if you don't like the pairings that were created. Click Let's Play to start the game. 


6. Once the game starts, pairs of students will be given a word and the definition you loaded for them. One of the students is asked to draw an example of the word and the other student is asked to write an example. Remember, they are given the word and the definition so they will need to draw and write to show their understanding of the word. When they are done, they will click Ship It. A smaller version of their flashcard will appear on the screen you are projecting and it will land on a conveyer belt. 


7. Once everyone has done all of the words you will click to move on to Quality Control. The students will have an opportunity to look at every flashcard and collectively decide to keep (green check) or reject (red X) each card. You have the ability to see who made each card but it is not printed on the cards. 


8. The last phase is called the shipping phase. You can print the cards or export them to Gimkit. In lieu of printing, you can also opt to save as a pdf when you get to the print menu. Save the pdf to your Google drive and share the link on your Schoology page so your students can easily access them. 


Want to learn more? Here is a quick seven minute webinar to walk you through using Pear Deck's Flashcard Factory.


Want some help getting started? Feel free to book a time with me so we can get your students creating incredible flashcards.


Tuesday, December 19, 2023

2023 Giant EdTech Year In Review

2023

GiantEdTech

Year In Review


Just like summative assessments, this is a wonderful time of year for us educators to take stock of our own learning and professional growth. I sometimes struggle with understanding my own data but often remind myself that just the act of reflection and questioning is an important exercise in understanding how far I have come and the direction I want to be headed in. One of the big benefits of working in a school is that I feel like I get two "New Year" opportunities. August certainly feels like the right time to set those goals and plans for what we want the school year to be. As we turn the page on the calendar and welcome 2024, we are faced with yet another chance to align our practices to our goals and decide how we want the second half of our school year to go.

With that in mind, here are some statistics that I have gleaned from this blog:


Where We've Been:

As you can see, there have been 13,400 views over the last twelve months. The largest number of views came during August and September, while the summer months of June and July also saw a lot of traffic. The day with the single largest number of views was August 26th with 795 views. One of the most popular post was from August 20th, What's In The Toolbox.  This post has a nice short summary of five popular edtech tools that we pay for in our district. Now would be a great time to revisit and review your use of some of those tools. 

The second most popular post was from January of 2023. Quizizz Where Motivation Meets Mastery is a great reminder that sometimes the simple tools are what gets us the most impact for how much effort we put in. 

Coming in third place is a post on Google Workspace. If you haven't seen what's new with our Google tools you are definitely missing out! Click here to take a look at Google Workspace: AI, Pageless Formats, Emojis, and More!


Where We're Headed:

There is no doubt that the use of artificial intelligence in teaching and learning spaces is here to stay. Gamification and personalized learning continue to be trending as well. 
Google For Education, along with Canvas8, conducted a study across 24 countries on the future of education. They released a three-part global report. Here is a link to the entire report. The report has three parts. Below is a brief summary. Think about what each of these means for you and the work you do with students. 

  • Part1: Preparing For A New Future
There is a need for educators to rethink the role of education in society. There is a rising demand for global problem-solvers, people who see themselves as lifelong learners, and the ability to adjust and change skillsets that are required for work.

  • Part 2: Evolving How We Teach And Learn
The latest advances in technology are changing how the world thinks about teaching and learning. There is a need for a more personal approach to learning. Reimagining how learning is designed will be important for student growth and success. There is also a shift from the role of teachers as the "gatekeepers of knowledge" to the "choreographers of learning". 

  • Part 3: Reimagining Learning Ecosystems
Upgrading learning environments through investments in digital infrastructures are helping to create new visions of learning environments. There is a greater need for blending technology, pedagogy, and physical space.  As educators have greater access to data and insights, decisions can be made about which tools and practices can have the greatest impact. There is also increasing demand for more meaningful ways to track student progress and more effective modes of assessment. 


Speaking of Google, have you seen this year's "year in search" video? It celebrates 25 years in search. Check it out:


Key Takeaways from 2023 To Bring Into 2024:
Here are the lessons that I have learned that I am bringing with me as areas of focus for the upcoming year.

  1. Artificial Intelligence is here and we are responsible for teaching our students how to use it responsibly, even if we are not 100% sure how to do that.
  2. Adaptability and resilience are some of the most important qualities that will help our students in the future. We should be working on how to build these skills.
  3. Teaching and Learning requires humanity. Yes, lots can be done with technology, but it's the human connection that keeps us all going, students and staff alike.

See you in the new year!


Tuesday, November 30, 2021


​​


Panorama, Data Filters, and Groupings

@LisaBerghoff/@MrKimDHS


Infinite Campus vs Schoology vs Panorama

Between these three systems, it can be confusing to pinpoint what their strengths and weaknesses are relative to each other. Let's find out more about how we can leverage each system to fit our many needs as we support our students. So, what exactly are the differences between Panorama, Infinite Campus, and Schoology?

  • Infinite Campus is a Student Information System, or colloquially referred to as a SIS. In this capacity, IC is our main information hub for collecting, tracking, and reporting student data. Most, if not all of our secondary systems like Schoology, Remind, Panorama, and Google products pull their data from IC. Simply put, student data lives here and we use other programs to extract that data.

  • As we well know, Schoology on the other hand is our main academic system that supports our curricular and pedagogical goals. It's the primary way we interact with our students online via assignments, assessments, calendars, updates, and more. 

  • What Panorama attempts to do is make sense of the raw data from IC and Schoology to support our RTI, MTSS, and SEL goals. It does a really nice job packaging and presenting student data in an intuitive and visually pleasing way. I'm not going to lie, whenever a teacher asks me to help them pull Ad Hoc reports for data in IC, I cringe knowing that for all of my strengths, creating filter data is not one of them. Thus, Panorama has so far filled that niche by giving staff more regular access to filtered student data.

Panorama Filters

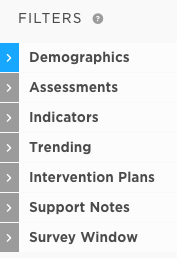
As most of you should know by now, you can filter your students' data by adding filter criteria on Panorama. So instead of creating individual Ad Hoc reports in IC, you can quickly adjust your search results by toggling your options. 

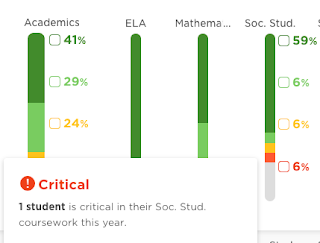
So let's say that I needed to find out which of my senior students are considered academically critical (failing at least one class) in let's say Social Studies, I can filter through my students to find exactly who I need to focus on:


Panorama Groups

In addition to easily filtering your search criteria, Panorama has a pretty solid system of keeping tabs on progress by allowing us to create two types of student groupings: Smart and Static Groups.

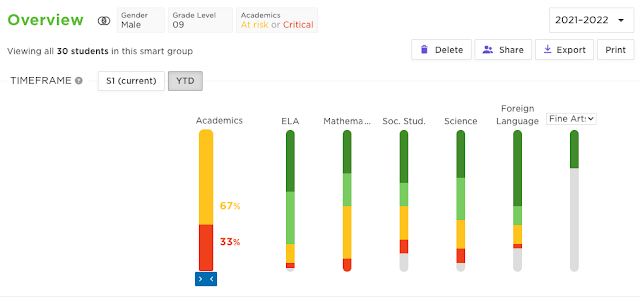
A Smart Group is a way of tracking a particular population of students by identifying relevant criteria. So let's say that I wanted to keep track of all Freshman boys who are receiving either a D or an F in at least one of their classes. I would simply search using those filters to get my results. But to keep tabs longitudinally, I can convert the search results into a Smart Group. The group will be dynamic, meaning once a student no longer fits the filter criteria, they will "graduate out" and will be automatically removed from the group. Consequentially, students who newly fit the group criteria will be added to the group.


A Static Group on the other hand is based on manually choosing a specific list of students. Regardless of their academic, attendance, behavioral, or SEL data, they are permanently fixed to this group unless you manually remove them. So let's say for example I want to keep tabs on the JV Volleyball team. Regardless of how each individual student-athlete is doing, you'd like to be able to group and keep tabs on them throughout the season/year. Luckily those groups are automatically created for you from IC, but you can create as many unique static groups as you'd like. You can add students to a static group by merely checking the box next to their name and choosing "add to group."


So while it is yet another system to learn and to utilize, I personally believe that Panorama is a highly effective way of leveraging student data to pursue our school goals. Tapping into the enormous utility of identifying and understanding trends and patterns in our student data has never been easier. Luckily, Panorama offers more than just filtered data and groupings. More to come! Let us know how you've been using Panorama below!


Monday, April 11, 2016

Do You Have To-Do Lists On Your To-Do Lists? 

Organize and keep it all straight with Google Keep.

@LisaBerghoff/@Joe_EdTech


Spring is here! The sun is shining earlier in the morning, the birds are chirping, the winter coats are getting closer and closer to the closet. I'm hoping to actually put them away very soon. This time of year always motivates me to clean out the clutter and reevaluate my organizational systems. My friends who are not teachers often make comments like "Oh, things must be winding down for the end of the school year." Ha! Those of us who work in schools know that the end of the year is actually something along the lines of running full speed into a brick wall.  Fourth quarter just gets busier and busier until it comes to a screeching halt.  I often wonder how it will all get done. This is when I really need some help with productivity and organization. My to-do lists start branching off into other lists and I begin to worry that something is going to fall through the cracks. 

Our buddies at Google have created a little known tool called Google Keep. Google Keep is a note-taking service that allows you to make virtual sticky notes. You can create lists, use images, color code your notes, and of course share your notes with others so you can collaborate and keep everyone in the loop.  GKeep is friendly, colorful, and easy to use. Also, you can use your Google apps account information to log in so there is no need to create a new account and create another password that you may or may not remember. There is a GKeep app that can be added to your android phone, iphone, or tablet. Think of Google Keep as a digital version of that little notebook that you may carry around with you. I keep a composition book in my bag and will often write little notes to myself or start brainstorming ideas in that book. With Google Keep, I don't need to have my book with me because I can access it from pretty much anywhere.
Screenshot from Lisa's computer using GKeep

Using Google Keep (or GKeep as the cool kids call it) makes a lot of sense for helping to keep track of your own to-do lists, big ideas, reminders, etc. As with all Google apps, it saves automatically and syncs to all of your devices. You can also add labels to make it even easier to locate all of your incredible ideas and important information. Of course you can search your notes so when you have amassed a large amount of amazing, inspiring, thought-provoking ideas you can retrieve them without a problem.  If you have a note that gets really out of control, you can easily create a google doc from it with one click of the mouse. 

When I think of classroom applications for GKeep, I know my students would benefit from using it when they are working on group projects. Imagine if a group of students used shared to-do lists which they can check off as tasks are completed.  Or at the very start of a project, they could create notes to keep track of their brainstorming thoughts. When we think about next generation skills, we know that being able to effectively work in groups on collaborative projects is extremely important. 
Students can use Google Keep for their own notes in class and can set reminders based on date and time OR location. For example, it can be set to remind me to update my blog when I get to my house. 

Got 47 seconds?  Here's an informational video about Google Keep:


Find out more at the Google Keep help center.

What are some other ways that you use Google Keep in the classroom? Feel free to share in the comments section below.

Monday, January 24, 2022

Winter's A Grind

5 Tips/Tools For Maximum Engagement 

@LisaBerghoff/@MrKimDHS

I will admit. I love the snow! I think it's beautiful and peaceful and I love winter outdoor activities like skiing and snowshoeing. So much of it has to do with owning the right gear. I have a great ski jacket, mittens, hat, neck gator, etc. In general, having the right equipment makes the experience so much better.   Third quarter, or what used to be third quarter, is always a bit of a grind. The holidays are over and it's cold and this is typically the time of year when we see students struggle the most.  For many of us, the snowy cold winter makes us want to hunker down and move as little as possible. It's our Chicagoland version of hibernating and I totally understand that too. 

Here are 5 tips/tools to remind you that with the right gear, your students can be engaged, enjoy learning, and make progress even though it's January. While these are not new, it can be good to be reminded that we have them and can use them in an in-person learning world. In addition, there are always new ways to use these and we have not come close to exhausting the possibilities. 

Goosechase:  
Goosechase logo image
What is it?  A scavenger hunt app.
How do I use it? Go to Goosechase.com and log in. You create your "missions" or tasks here. Students download the free app onto their phones and submit pictures or text to complete the missions. As the teacher, you will see all of the submissions and the leaderboard.
Why should I use it? This is a FUN game that can be played in school in teams so only one person per team needs the app. Or, you can create a game that lasts all semester long! There are many applications for Goosechase.

   
Kahoot:


What is it? Ummmm, it's fun!
Kahoot is an interactive game-based platform for learning. If you haven't looked at kahoot in a while, it's a good time to take another look as they are constantly updating features and their interface. 
How do I use it? Go to kahoot.com and set yourself up with a free account. You create games by adding questions and you can adjust question types and also the way students interact with the game. This can be done live in class or assigned as homework. When you are ready you will have your students go to kahoot.it and enter the game pin you give them. 
Why should I use it? Kahoot has been around a while which in tech years means a lot. It's fun, engaging, interactive, and can be set up in many ways so it doesn't get too stale. It's great for kids who don't typically speak up in class. You'll probably be surprised by who is on your leaderboard. 


PearDeck:

What is it? Pear Deck is a way to embed interactive elements into Google slides. It's ALSO a great vocabulary/review game called Flashcard Factory. We are lucky to have two certified Pear Deck coaches in our district. Reach out if you want to know who they are!
How do I use it? Start by getting the Google chrome extension. You can also go to peardeck.com  and click Getting Started to learn how to use it and to connect to your Google slides that you already have created. There is now a feedback/reflection feature where you can give feedback to students. We have a premium license to Pear Deck in our district which means we have ALL the features. If you haven't used Flashcard Factory, it's also found at peardeck.com and click on Pear Deck vocabulary. Here is an overview of Flashcard Factory. 
Why should I use it? Sometimes we walk out of a class that seemed to go so well and then we realize that we really only heard from 5 or 6 students in the class. Pear Deck helps make sure everyone is participating. You can also set it to student-paced to differentiate the amount of time so you can meet the needs of more students. 


Quizlet Live:


What is it? A game within Quizlet that requires students to work in teams as opposed to individually with their own flashcard set. 
How do I use it?  Create your flashcards or question set in Quizlet. Then, you will click where it says In Class Live. You will get a game pin to send to your students and the program will put your students into teams. They need to physically be together to make this work since their answer choices will all be different.
Why should I use it?  In this world of awkward interactions, it's nice to have something prescribed and potentially less awkward.  Students are forced to work together and they really need to talk to make this work. 


Schoology Discussion Question OR Poll


What is it? Interactive questions that are already in the place where your students go for everything else! You may be trying to have discussions in your classes but students have forgotten how to do that. These give you the ability to add some interactive elements that you can use as a springboard for in-person discussions. 
How do I use it? From your materials page, click add materials and then choose Add Discussion. You can have students respond with text or with images, or even with audio or video responses. For a poll, go to the updates page and choose the poll icon at the bottom of the box then enter the poll items. Responses will be anonymous. These could also be a great on ramp to discussions in class.


What are your go-to tools when things feel cold and gray?
Let us know in the comments below!