Showing posts sorted by date for query backchannel. Sort by relevance Show all posts

Sunday, August 20, 2023


What's In The Toolbox?

@LisaBerghoff

*image above was created with Canva's text to image AI tool


I was shopping for school supplies with my kids last week. Maybe it's just me but there is something exciting about bringing home new notebooks, folders, and pens. Yes, they are the same supplies we bought last year, but when they are brand new it's like there are endless possibilities.

I feel the same way about our digital tools. Many are the same we had last year, many also have added new features, but it's the idea of the endless possibilities of how we will use them with our students this year that gets me excited. 

Here is a list of some of the items available to you in your digital toolbox. Many of these can be utilized in lots of different ways. I would love to explore these with you so if you want to work together please reach out.

Here are the top 5 (in no particular order) that we pay for click here to see the whole list:


Pear Deck gives you the ability to create interactive slides. You can create a prompt on the fly or in advance and your students can work along with you as you lead them or you can set the activity to student-paced. Within the Pear Deck suite lives Flashcard Factory, which is a partner activity that can be tailored to any lesson, and Giant Steps, which is a game-like activity where you can create questions and your students can play with you in person or on their own. There are lots of Pear Deck posts in this blog, feel free to search the archives or reach out to me for help. I am a proud certified Pear Deck coach.


Read&Write for Google Chrome is a chrome extension and the premium version is available to ALL students and staff. This is your one stop shop for everything reading and writing online. It has text to speech, a highlighting tool, a screen mask, a vocabulary builder, voice notes, and so much more. This is an extension that many adults in the business world are using and it would only make sense for us to teach our students about this tool now. There are also many blog posts about Read&Write in the archives so feel free to check them out. I'm happy to work with you and your students to get you up and running.


Screencastify is your go-to tool for screen recording and basic video editing. Yes, the students have access to it too! This is a fantastic tool for students to give presentations and voice over their slides. You can also now give assignments right on the Screencastify dashboard. Just look for the orange arrow in your chrome extension bar and try out the various tools you and your students can use to create videos. 


Want to assign videos for your students to watch? EdPuzzle is a great way to make those videos interactive. You can add questions and notes and it integrates with Schoology. EdPuzzle now also has a great content library with their own videos in addition to all of those found on YouTube and elsewhere. If you set it up with multiple choice questions it will also auto-grade!


Did you know that we have a building license for Padlet? That means that you and your students can make unlimited padlets and you can set them to only be visible within our dist113 environment. Padlet is a digital bulletin board. But really it's so much more than that. You can create timelines, maps, use it as a backchannel, a review guide, a hub for resources, a way for students to display work and give and get feedback and more. 

Want to know what else we have? Check it out here.


These are free and amazing:

Canva- Do I need to tell you what Canva is?  Probably not. 

Flip- Students can interact with you and each other via short videos. Great mobile app! Easy to use. So easy my niece's 2nd grade class used it. Try it. You won't be disappointed. 

I am so excited to see what you and your students create with these tools! Don't forget to reach out for help or just to bounce ideas.


Monday, February 8, 2021


2/9/2021 Hybrid Learning strategies


 Strategies for Hybrid Learning

@LisaBerghoff/@MrKimDHS


Take a deep breath

For what seems like the 100th time in the last year, we're experiencing a paradigm shift in the way that we approach teaching and learning in the era of social distancing and video-conferencing. Luckily the vast majority of skills and techniques needed to understand and engage in hybrid learning, have already been in use since we started remote teaching a million years ago last March. You'll be surprised at how many instructional tools and strategies that you mastered this past year will continue to keep you afloat for hybrid. While you may be apprehensive to start, take some pressure off of yourself and your students for the first few days or weeks of hybrid. Don't expect to immediately utilize and excel at every new technology made available. 

Two Challenges in Hybrid

 Alright so half of your rascals are physically in front of you and the other half are still in their PJs on Zoom/Meet. Here are two questions you're probably going to ask yourself:
  • How do I get my in-person students and my remote students to see and interact with each other?
  • How do I get both groups to see and interact with the same things that I want to show them (whiteboard, PDF, Google Slides)?
Before you get to the following strategies, it would be beneficial to acquaint yourself with the District 113 Technology resource on the new classroom technology. You may also need some assistance for the first few times you try out these strategies. That's OK! The technology staff will be there for you.

Interaction

Option 1: Project your remote students' faces to your overhead projector for your in-person students to see, and point your classroom webcam towards your physical students and share that view for your remote students to see. Students can communicate through the speaker/mic features that also come on the classroom webcam. 

Option 2: While Zoom/Meet chat can be sufficient for text-based communications, consider moving over to Google Chat for threaded conversations. District Google Chats are permanent and will auto-save, and every district staff member and student already has an account. Staff could also open up the chat on their phones to keep up with classroom backchannel talk if your laptop attention is needed elsewhere. 

Presenting

Option 1: You can utilize your whiteboard and have both groups clearly see your work by pointing the classroom webcam towards the board and sharing the camera view on Zoom/Meet. It might also help to think of the webcam operating essentially the same way as a document camera would. This way your in-person students merely need to glance up to view your work, while your remote students can see through the webcam.

Option 2: Share your laptop screen exactly the same way you would during remote. If you have a PDF, YouTube clip, or Google Slides/Powerpoint you'd like to present, share that window on Zoom/Meet the same way you would during full remote. The only difference is that you are also projecting your screen to the overhead for your in-person students to view as well. 

Asynchronous Back-ups

It's also a really good idea just to have a few asynchronous back-up plans for the first few weeks of hybrid learning. Technical difficulties breaking apart your hybrid lesson plan? Feeling frustrated and anxious and lost? Whip out that asynchronous plan and be available on Zoom/Meet or Gmail for questions. 

Just remember: everything is going to be ok! It won't be a seismic shift from fully remote to hybrid, and the entire technology staff will be there for you and your students the whole way. Any questions or concerns? Write below!

Monday, October 12, 2020

Bring Back The Fun! 5 (or more) Incredible Ways To Use Flippity With Students


@LisaBerghoff/@MrKimDHS


    When I first started teaching I thought there had to be a certain level of seriousness in my classroom. If a colleague walked by and it looked like we were having too much fun I felt like I needed to explain. I have always been a fan of playing games to learn, even with high school students and yes, even with adults. That was many years ago. We now have loads of neuroscience research that tells us that fun and joy in learning is actually important for information transmission and storage in the brain. Think about your own experiences with learning something new. What do you remember? My most vivid learning memories are with teachers who were creative and allowed play to intermingle with learning. When you are able to laugh and experience joy, there is a certain comfort level that reduces stress and actually makes it easier to learn.

    While the tone you set in your class and the classroom norms that are created are ultimately up to you and your students, there are some fun tools that you can use to help. Flippity is definitely at the top of the list.  I knew that I had written about Flippity before but was surprised to find it back in 2017 and not sooner so this is a great time to re-introduce you to this very versatile tool.

    At its core, Flippity is a tool that takes information from a Google spreadsheet and turns it into something you and your students can interact with. For example, if you have a vocabulary list of terms and definitions in a Google sheet, it can turn that into a set of online flashcards.  The website is not flashy and each item has a demo, a set of step-by-step instructions, and a template for you to copy and use. Even if you are familiar with Flippity, they have added some new and exciting items. Now, there is even a tab where you can create these activities without a spreadsheet, which is perfect for those of us who are spreadsheet-phobic. Take a look at all of the activities you can instantly create and use!


My Ten Favorite Flippity Activities (In No Particular Order)

1. Quiz Show

This is just like Jeopardy and you get to be Alex Trebek!
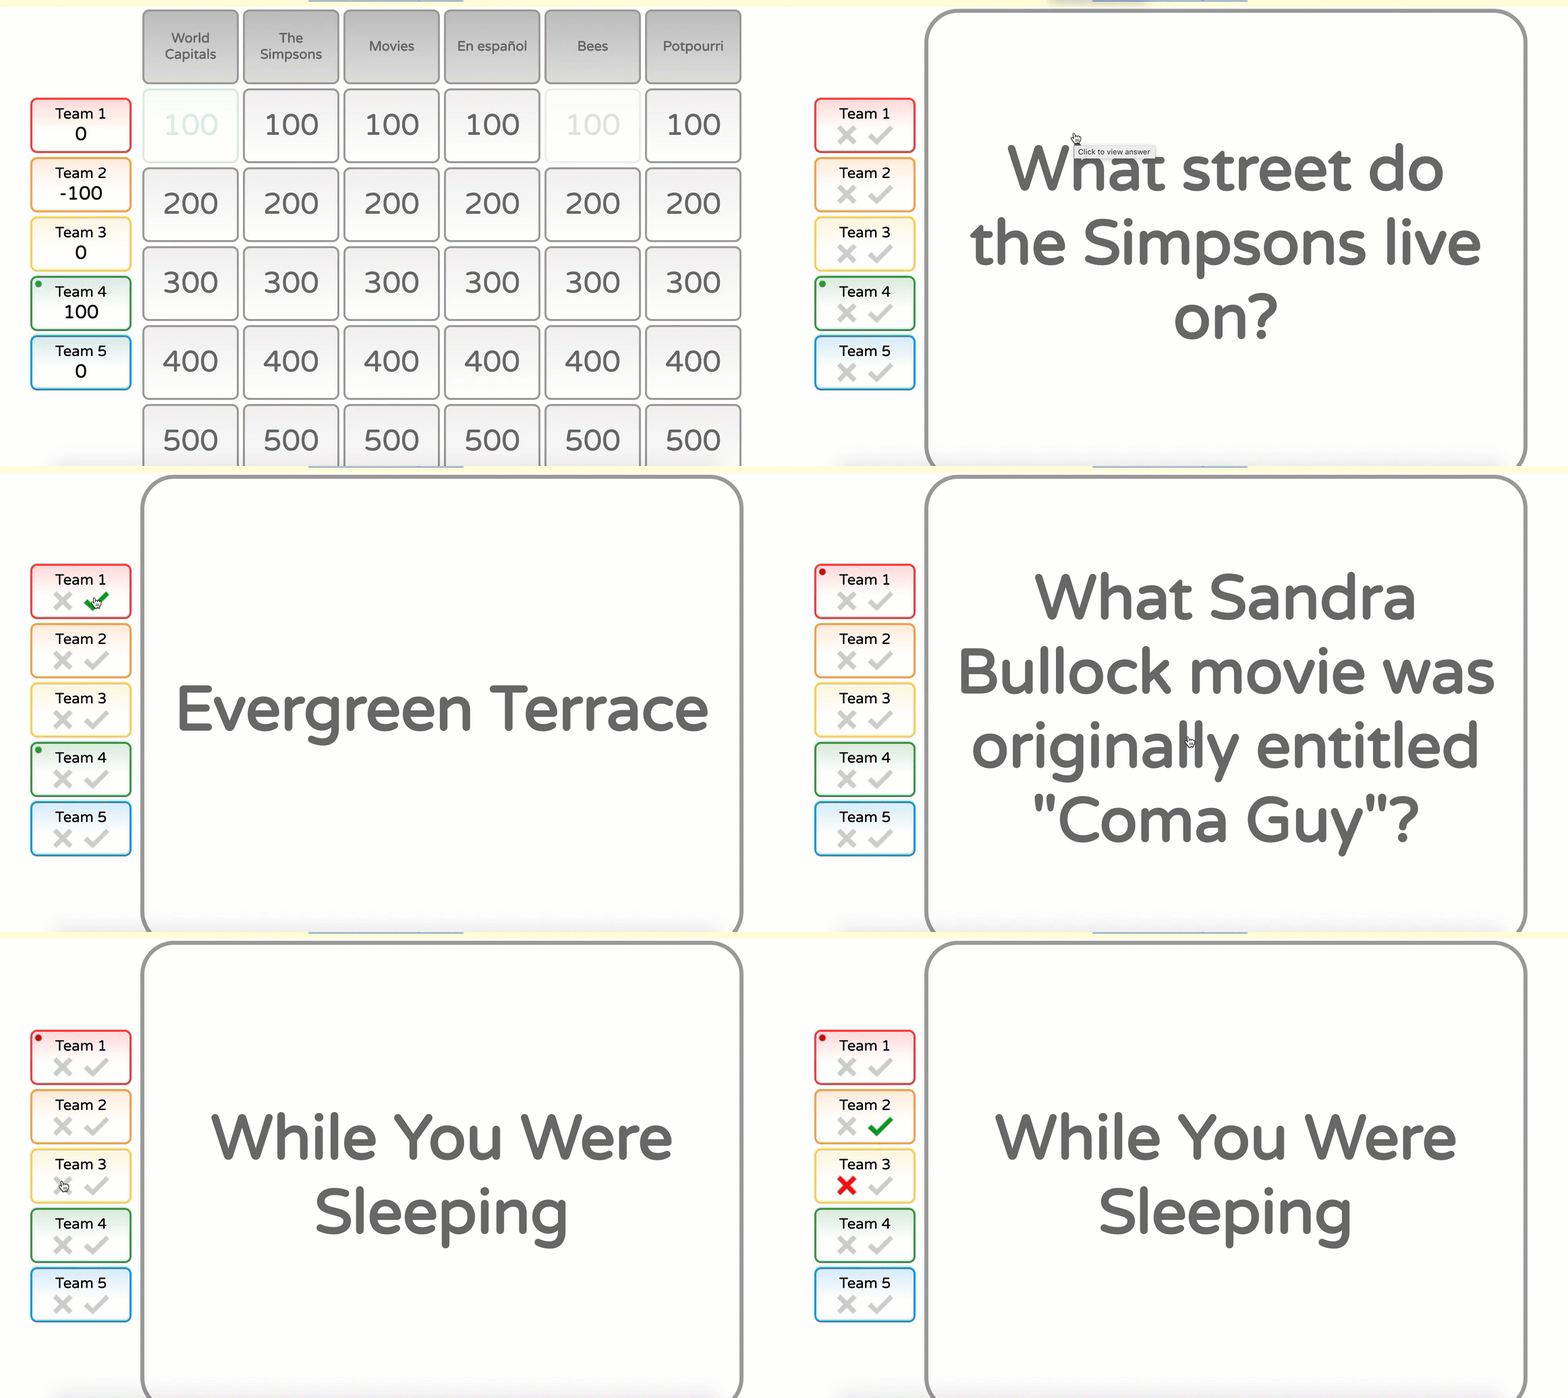
 Sometimes a little friendly competition can help mix things up in your learning space. All you need are the categories and the questions with answers. Put kids on teams and have them rotate through who will be the spokesperson. They can set up a google doc to use as a backchannel for discussion. Did they get it right? The bell will ding and assign them points. Did they get it wrong? There is a buzzer for that. 


2. Self-Assessment Quiz

    We want our students to be thinking about their learning. I think that is why so many of us are drawn to the idea of standards-based grading. We want those measurements to make sense and paint a picture that shows where a student currently is in terms of their skills. We also want them to be able to accurately assess themselves and understand their progress. The Flippity self assessment quiz is new and it's a pretty slick way to ask the students some questions that will then give them a read out that explains where they are at. The demo tool was a Lord Of The Rings character quiz. Here's how I faired, apparently I am 50% of the way to being a hobbit. You can edit and add your own list of skills and learning objectives and determine the measurements that would be helpful to explain the picture of the students' learning. You then add your questions for the students to complete. At the end, you will get a link to share so they can do it themselves.


3. Scavenger Hunt

If you have ever used Breakout Edu then you know how engaging, exciting, and fun a breakout box/scavenger hunt-type activity can be. You also know that they can be cumbersome to create, though well worth the effort! Stay tuned, if you haven't heard of Breakout Edu that will be an upcoming post. The Flippity Scavenger Hunt is brilliant and can be tailored to any content level. The idea is simple, you need to unlock the locks to get to the end. Game on!  The demo has 8 locks, you can set up as many as you want.  Here is what it looks like.


4. Virtual Board Game!  

Board games are fun and there are so many different ways to take advantage of this online version. The hard part has already been done for you. There is a die to roll and on each space there is a piece of information, telling the player what to do. The game is set up to be played on one device by screen sharing so one person moves the pieces for everyone. This demo is set up for math and uses desmos, youtube, and equatio. This is a great game for incorporating multiple tools. 


5. Flippity Manipulatives- aka click and drag cards

I am including this one by popular demand. It seems so simple but it has been a little hard to find. Many teachers are looking for ways to make click and drag cards that students can manipulate. This is a wonderful way for students to show their understanding, to categorize items, or to put items in a specific order for study. You can use media on these cards as well.


There are a total of 25 tools that you can create with a spreadsheet. Several are featured specifically for virtual learning configurations and there are 11 that you can create without a spreadsheet. I would love to hear how you are using Flippity!

Monday, April 15, 2019

Yo Teach! 

Backchannel Like You Mean It

@LisaBerghoff/@TheMrKim


After reading Most Likely To Succeed (Preparing Our Kids For The Innovation Era) a few years ago, I have a new understanding of our education system and how we got here. Once you see it, you can't unsee it. For example, the way classrooms are set up, the sequence of curricular options, even how our hallways are organized all come from an earlier era when compliance, quiet, and rote memory were priorities. Teachers wanted students to sit quietly in their seats, in rows, and absorb the information given to them so students could repeat it back on tests. There was no room for creative thinking, or critical problem solving, or collaboration. 

Today, I am amazed with our students as I walk through the halls of our schools. I love to listen in, look around, and ask kids what they are working on. 99% of the time, they are totally on  task. It may look like organized chaos, but our students are learning in new ways and  no longer expected to sit and be lectured to. 

If only there was a way for our students to have a structured conversation or ask questions without disrupting the flow of class. If only there was a way for shy students, or students lacking confidence, to get in on the class discussion without putting them in anxiety provoking positions. If only there was a way for our students who struggle with impulse control, who need to get their questions and comments out now, could do it without social embarrassment. If only a teacher could follow the discussion going on among most students, as opposed to just those few who raise their hands.

If Only...

For those of you scratching your heads right now, I'm about to introduce you (or re-introduce you) to the concept of a backchannel. There was a previous post on backchannels in February 2016 that includes a list of ways to use backchannels in the classroom as well as a guide to student backchanneling.  As our seasons change, so does technology and the 2 backchannel sites mentioned in that post are no longer in operation. I have 2 more new ones for you to try and if you weren't sold on it the first time around, I thought this would be a wonderful time to reintroduce the concept. 

A Backchannel is an alternate route for communication in your classroom. The  first time I experienced a backchannel I was at a conference. I was sitting in a very long session that was really quite good but I just couldn't stay focused. I started to think about opening my email when I saw the backchannel link posted on the presenter's slides and I decided to check it out. I was amazed to find that many other participants in the room were also on the backchannel. As I started to feel bad for the presenter I started to read the posts and saw that nearly all of the comments were on topic (it was baseball season so there might have been some score sharing). Participants were posting suggestions, ideas, questions, thoughts, and more. The presenter even had someone designated to monitor the backchannel and several times paused to respond to a question that was widely asked.

I have seen this happen in classrooms as well. From "fishbowl" conversations to group check-ins, to crowd-sourcing feedback, there is definitely a place for the backchannel in school. 

Another wonderful thing about backchannels is they are incredibly quick and easy to set up. Here are two that are currently on my list:


Yo Teach! 

This backchannel site is free, simple to use, and has some nice interactive features, including the ability to draw. In Yo Teach, you can set a password so only your students can enter. You can  also  set your "room" so that it is not searchable. All you have to do is click "make room", give it a name, and set the password. Then your students can enter using using a pin or the built in QR code. Students enter their name and the password and then they are in. 
Here is a 1 minute video showing how to get started on  their new interface.


Backchannel Chat

This backchannel is designed for teachers so it has a few more bells and whistles and allows teachers to do more moderating.  Backchannel chat has a few pricing options with the free version allowing for 30 concurrent students and a "fair use" policy on the number of rooms. In other words, if you go overboard they are going to politely ask you to pay. You can  also access a web transcript of your chat. The site also allows for embedding YouTube videos and Flickr images. Backchannel chat is also simple to set up and allow your students to access. All they need to do is type and hit send. You have the ability to remove any comments or give students view only access. 
Are  you using backchannels in your classes? Post in the comments below and tell us what you are using and how. Want some help or to see some examples? Let us know!

Tuesday, November 6, 2018

11/5 - Improving Student Communications with Google Products

Improving Student Communications with Google Products

@LisaBerghoff/@MrKimDHS


As mentioned earlier this year in a blog post about the SAMR model, its creator, Dr. Ruben Puentedura, is the real deal when it comes to innovation and wisdom in instructional technology and education. He's identified some complex challenges impeding the adoption of educational technology, and one such challenge is the ability to scale teaching innovations. Here's what I mean by scaling innovation:

Amazon has these wonderfully active factory floors where giant, roomba-like robots zip and zoom in perfect robotic harmony to move about hundreds of thousands of our impulse Amazon Prime purchases. While some jobs were unfortunately made obsolete, the efficiency of this system is crucial to support both the staggering growth of the Amazon empire, and our obsessive need to have [insert random household item here] delivered to our doors in two days for free! 

These efficient little machines are innovations that can be easily scaled. What works for one Amazon factory works for ALL Amazon factories. Unfortunately our classroom innovations do not always scale. Beneficial apps or digital resources that work for one class may not work for another class for various reasons like student age, course content, ability, instructor, and unfortunately financial support. 

This is what creates such value in tools like Gmail, Docs, Sheets, Slides, and other G Suite applications. These (relatively) free tech tools offer so much diverse utility to help establish digital equity and scale teaching innovations. (Disclaimer: I do not work for Google, nor do I get paid to advertise their products...but I am willing to. Call me Sundar!)

So on to the stuff! Heavily inspired by Vernon Hills High School's tech coaches, here are some simple ways to develop student communication with Google:

Student to Parents - Weekly E-mails

Encourage students to keep parents in the loop with a simple weekly/bi-weekly message. "Feedback Fridays" can be a quick 5 minute routine built into your curriculum. 


Student to Student - Class Backchannel

Create a Google Doc where students can communicate with each other during an activity in a non-intrusive or disruptive way.

Student to Teacher - FAQ Page

Ask students to contribute to a Frequently Asked Question doc or form. For individual projects or papers, create a Google Doc where students can add important questions. Students can initial questions they would like to be answered. 


Have other ideas for developing student communication skills? Post below!

Monday, February 22, 2016

Backchannels. Go Ahead, Let Them Chat In Class!

@LisaBerghoff/@Joe_EdTech


I was at a conference a few years ago and even though the session that I was in was fascinating, it had been a long day and in typical fashion, I found my mind wandering.  Typically, I would have started making lists of things that I needed to accomplish in the upcoming week, ingredients that I needed to pick up from the supermarket, or my March Madness picks.  However, at this particular session the presenters had set up a backchannel.  I was new to the idea of a backchannel and was curious to give it a try.  One of the presenters was moderating the backchannel while the other was presenting.  Before I knew it, I was exchanging ideas with other participants in the room.  Did we stay on topic the entire time? Absolutely not. Was I more on task using the backchannel than I would have been if I was writing out my grocery list? Definitely. Also, I was actually interacting and creating meaning with other educators and not just sitting and consuming information. During this particular conference session, the backchannel gave me permission to converse with other teachers who were also in the room without disrupting the session. I was hooked!

The term backchannel refers to a digital conversation that runs concurrently with a face to face activity. Backchannels have many applications in our classrooms. They empower student voice and help allow every student in the room feel that they are participating in the knowledge building that is taking place in class.

Here is a just a short list of ways to use backchannels in class:

  1.  Assess prior knowledge. Have students use the backchannel to share what they already know about a topic.
  2.  Hold discussions of video content shared in class.
  3.  Have a "fishbowl" conversation where the students observing are actually interacting digitally.
  4. Check for understanding after a lesson.
  5. Crowdsource feedback from students on learning activities and then use the information for future lessons.
  6. Take a poll on a particular debate issue or topic. All students can participate in an unobtrusive way.
  7.  Have students ask questions or ask for clarification on something they don't yet understand.
  8. Engage shy students in classroom conversations.
  9. Brainstorm ideas for a project.
  10. Do a collaborative note taking activity.


Credit to Sylvia Rosenthal Tolisano: http://www.langwitches.org/blog

I'm ready to start using backchannels! Where/how do I start?

Ok, there are always multiple tools to use and people prefer some over others for various reasons.  Here are two backchannel tools that won't steer you wrong.

Today's Meet


Today's Meet is the most widely known backchannel. It is incredibly easy and a teacher can quickly set up a backchannel room in less than 30 seconds. Getting students on a Today's Meet backchannel room is quick and does not require a student log in but you can set your room for students to log in if you choose.  This backchannel is free and you can set your room to remain open for as little as a few hours or a full year. I'm excited to tell you that Today's Meet has recently added some teacher friendly features that were previously unavailable such as a projector view and built in QR code for your room but they also now have their "teacher tools", which are a paid upgrade. Join my Today'sMeet room here. 

81DASH  

81Dash was developed by teachers for teachers and they promise that it will always be free because they believe teachers should get free stuff.  How do you not love that?  This backchannel is perfect for classroom use because it is safe in that the teacher has the ability to monitor and control the discussion environment, called the "room" by 81 Dash.  Students can be uploaded by the teacher or the link to the room can be shared.  It also has the ever popular share to Google Classroom button. Conversation transcripts can be easily saved in pdf format and if a student deleted a comment, that comment will appear on the transcript in red. You can have unlimited students in a room and they are limited to 160 characters per comment in order to make the conversations easy to follow. Students can create their own private notes for themselves and you can create task lists for everyone in the room. You can also open or lock a room to control when comments can be added.  It sounds complicated doesn't it?  I promise that it is not. Here is a handy instruction sheet. Want to try it?  Join my room here and check it out.