Monday, September 2, 2019

10 Google Searches You May Not Know About

@LisaBerghoff/@MrKimDHS

It's funny how we've become so used to "Googling" things we want to know. I think back to when I first learned how to do research for a paper and I shudder to think about all of the misinformation that I believed because it was written in an encyclopedia that may or may not have been published sometime in the last few years. 

Now, we (and our students) have a world of information at our fingertips. We still need to be very discerning about what information is credible and what is not.
You know that if you put a keyword into the Google search engine you will get millions of options within a fraction of a second. In order to find the lightbulb image on this post, I first searched lightbulb and got 297,000,000 results in .60 seconds! I then narrowed it down to images and then narrowed even further to images that are not copyright protected.  

 Sometimes getting millions of results is just too much. If we start with something simple, it might encourage our students to ask more thoughtful questions and research further.

What you may not know is that there are lots of other uses for the Google.
Here are ten of my favorites that I have used in the classroom.
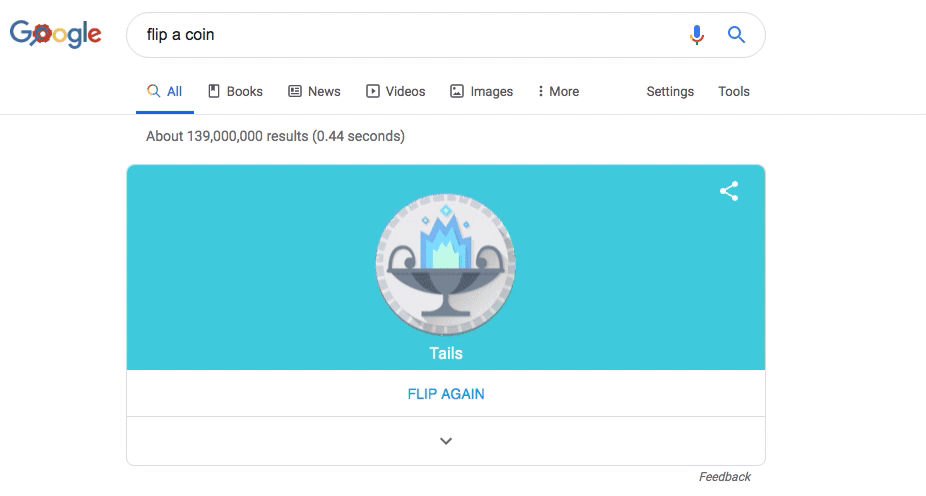
1. Flip A Coin

Can't decide which homework assignment to give? Studying probability? If you type "flip a coin" you will get a random coin flip showing heads or tails. 
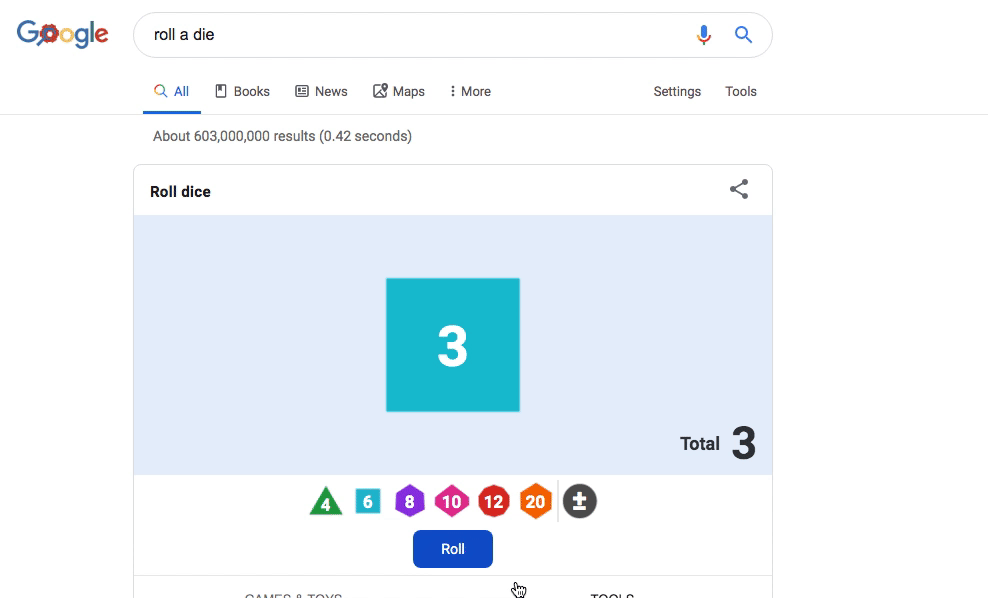
Image from Gyazo

2. Roll A Die

Also great for probability! I used this in class once to determine the order of questions we would review. Type in "roll a die" and you will get to choose how many sides and how many dice you would like to roll. You can then roll as many times as you like.
Image from Gyazo

3. Timers

I LOVE timers in my classroom. They keep both me and my students on task to make sure we're using our time efficiently. YouTube also has lots of timers but I find that they can often be distracting because they have crazy colors and sounds. If you search "five minute timer" you will get a basic timer that beeps when it's done. There is also a stopwatch feature built in just in case you prefer that tool. 
Image from Gyazo

4. Calories Of A Specific Food

Teaching health, nutrition, data tracking, or just trying to get healthy yourself? You can type "calories in ..." to get the calorie count of specific foods. You can also adjust for size or portion.
Image from Gyazo


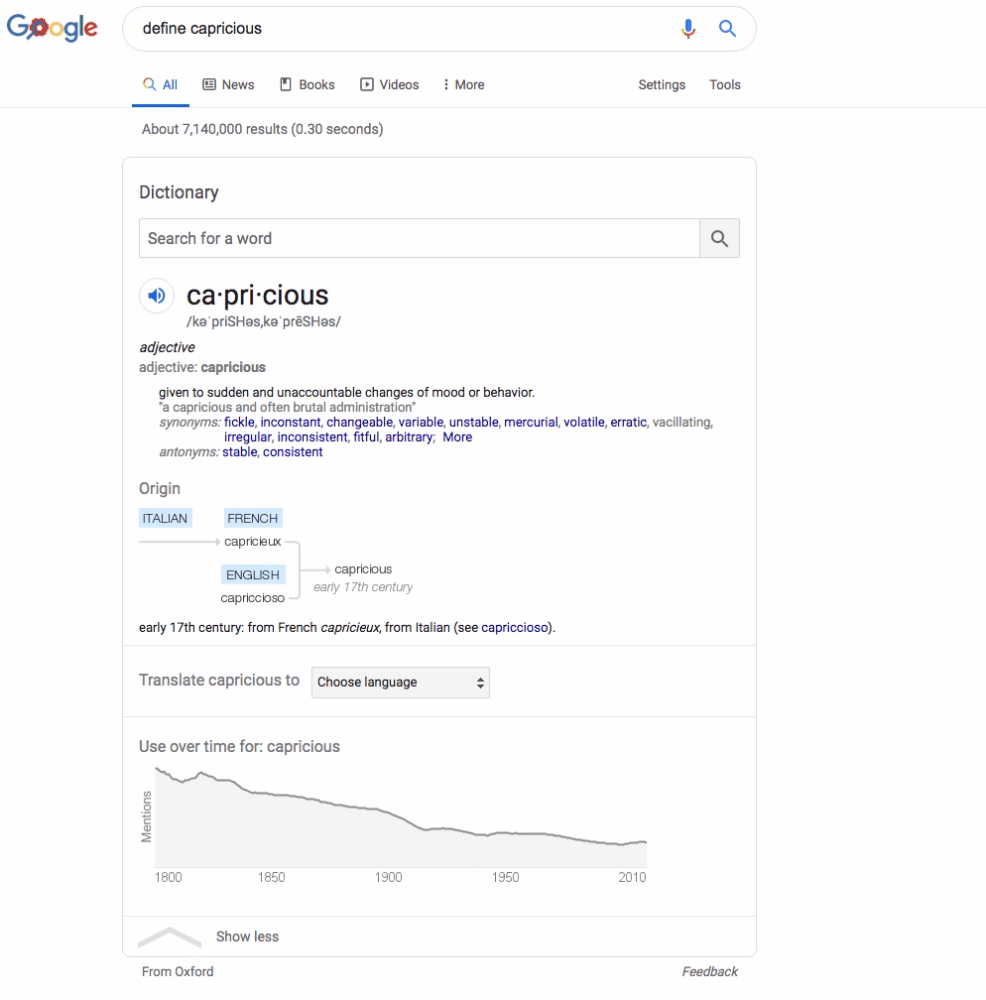
5. Definitions And Information About Words

Since literacy is the bedrock of learning in our world, our students really need a quick and easy way to understand the words that they are hearing and reading. Type in "define..." and you will get a complete definition in addition to the origin, synonyms, antonyms, and more.

Image from Gyazo

6. Weather Data

Type "weather in..." and you will get instant weather data including wind, precipitation, humidity, etc.

Image from Gyazo

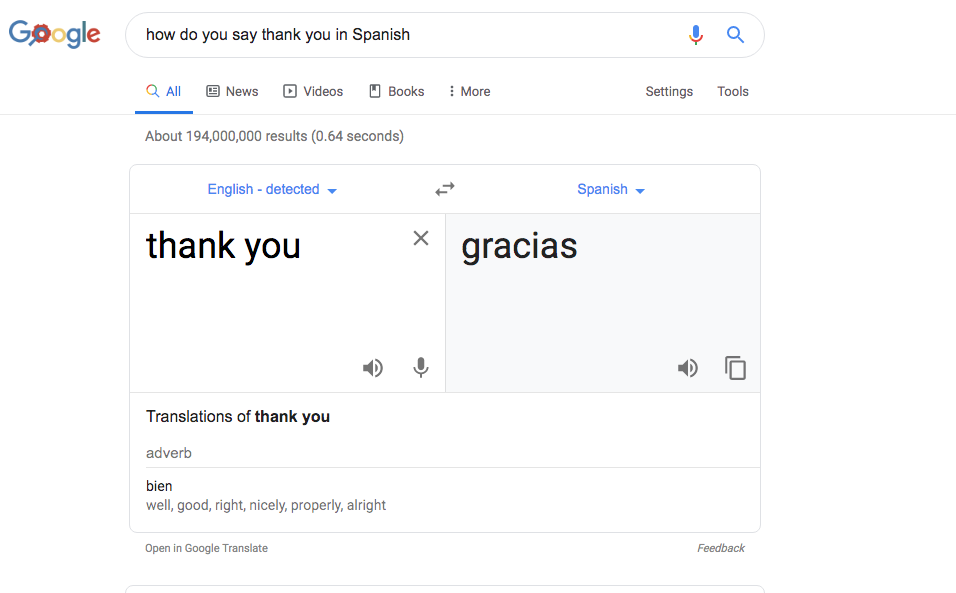
7. Translate Words From Other Languages

I know! It's absolutely not a substitute for learning another language. But sometimes we come across words and we need to know what they mean in order to move forward in our learning.
You can type in "translate..." or "how do you say... in ...". You will have a box to put the input language and another for the output language.
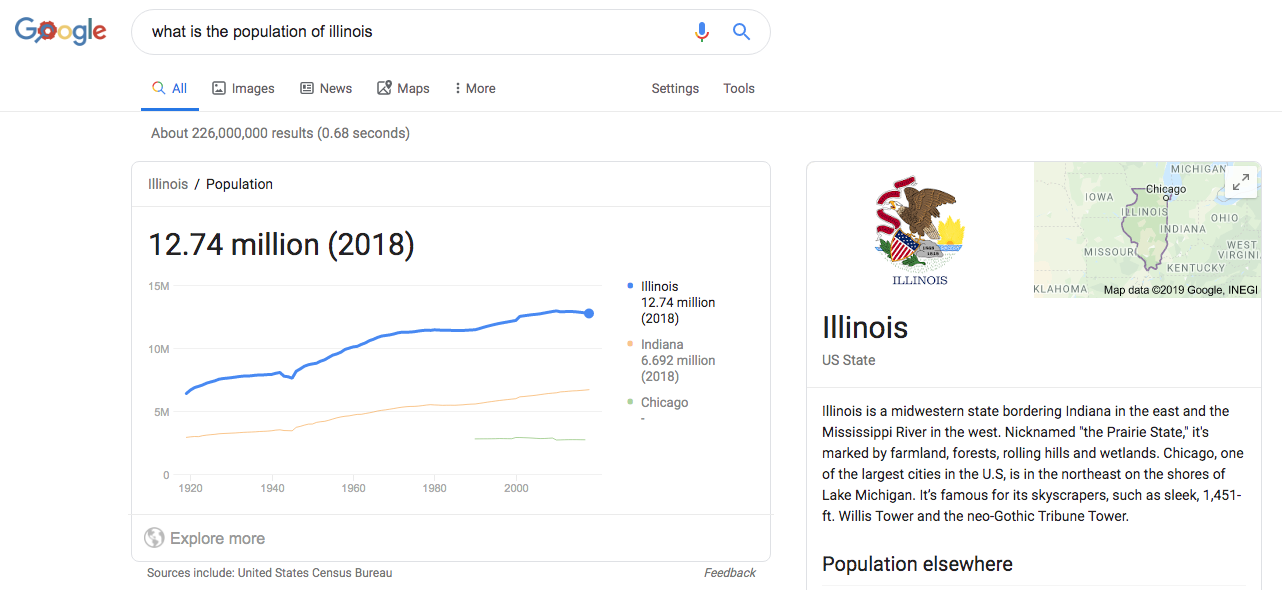
Image from Gyazo

8. Public Data

When teaching a concept to students, it can be most beneficial to them if you use actual real-life data instead of just made up numbers. You can enter the "term" and then the "place" to get the data, along with a graph and link to click to explore further.

Image from Gyazo

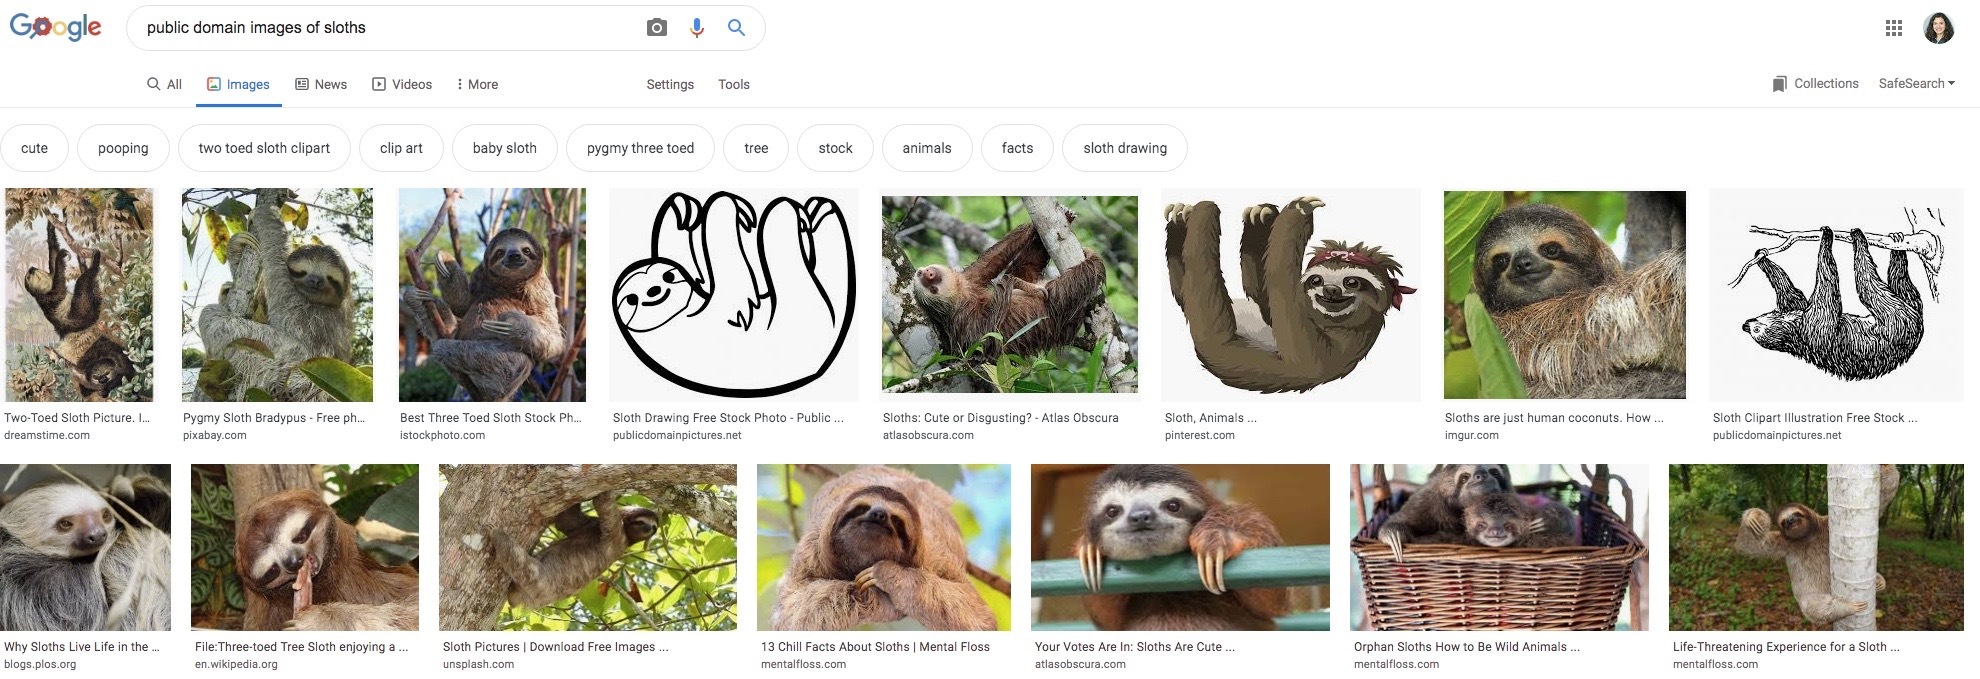
9. Find Images That Are Free To Use (public domain)

We should be teaching our students about fair use, attribution, and utilizing public domain images. Here's an easy way to make that happen. Just type in "public domain images of..." and Google does the work for you. No excuses!

Image from Gyazo

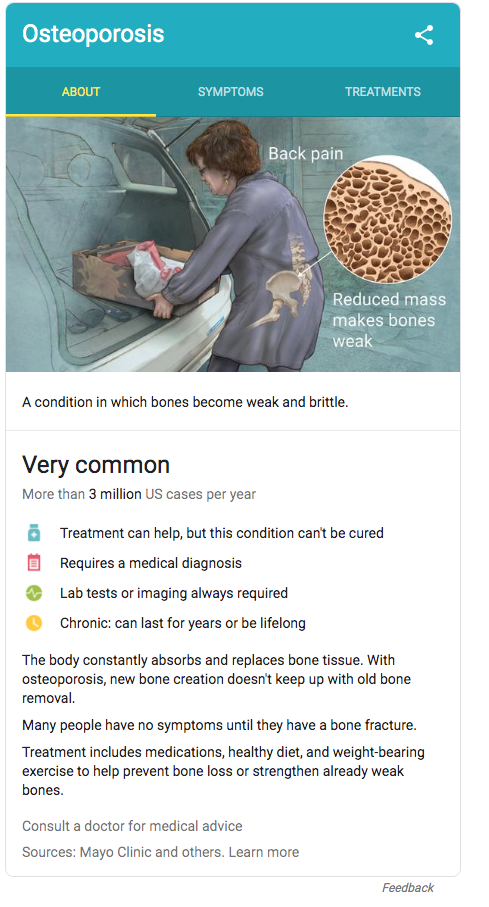
10. Medical Information

By just typing in a medical condition such as "osteoporosis", you can get a quick at-a-glance summary of commonality, treatment, what is involved in diagnosing, etc. I know, the doctor always says not to look on the internet, but I can't help it. At least I'm getting information from a decent source and not just a random search!

Image from Gyazo

I know there are lots more! What are your favorites?
I'm sure your students have also all tried these:
"do a barrel roll"
"zerg rush"
"pacman"


Happy Searching!

*This post was inspired by my friend, Eric Curts who writes the Control Alt Achieve blog.
Check him out here. 

Monday, August 26, 2019


Managing our District Website (Not Schoology...yet)


@LisaBerghoff/@MrKimDHS


Alright we're back at it. Time to do awesome things like update our school profiles of ourselves! Whoo! In all seriousness while it may not seem like a big deal, I do remember a time when I was fresh out of college, and I was cruising through every school's department websites, looking to get as much information as I possible could before I applied/interviewed. I especially appreciated those teacher sites that had important, up-to-date information all laid out for me. Also while my kid is still poopin' his diaper the second I put him in the car seat, one day he'll be in high school and I think I'd appreciate a chance to see the wonderful people that teach my kid. 

So here's a quick and easy guide to accessing your teacher websites on our district sites. While we may be moving some of that personal information to our Schoology pages, let's at the very least clean up our pages and update all relevant information.

Logging in

  • While you're on the school page, scroll all the way to the bottom and you'll see the "Log In" button.

  • Your login will not necessarily be your usual email and password. For example my login is the first letter of my first name, and my last name. Followed by my CURRENT password. 
  • After you log in, you'll see that the "Log in" has been replaced by "User Options"
  • Click on "Site Manager" and then click on "Teacher Home" to edit your own personal page.

  • Once in your summary page, click on "Teacher Home" to access your personal page. Here is where you can change up all of your personal information that students and parents would see.
  • The "About Teacher" is where you can write up a bio of yourself and add a picture. You can add files via the "Documents" button, and add links via the "Link Library" button. 
  • It'll probably be good practice to link your Schoology Profile page to your Link Library. To get your Schoology profile page, in Schoology, click on your name at the top right hand corner and click, "Your Profile."

  • Once there, copy the URL at the top of your browser, and add it as a "New Link" in your link Library. 


So what should you actually put in your "About Teacher" section. A concise description of your professional life, your work history, classes you teach and accolades could be a good start. Or perhaps you could use a style guide for some clarification. Information forthcoming! Welcome back D113!


Monday, August 19, 2019

Your Back To School Checklist: 

5 Things To Do To Start Off Right!

@LisaBerghoff/@MrKimDHS

clipboard and checklist
As much as I mourn the loss of summer, there is a kind of excitement in the air with the start of a new school year. I just love looking at all of the shiny new school supplies in the stores. Sometimes I wish as a teacher I could have my own school supply list. Today's post is a checklist of digital supplies that you will need to make sure your year runs smoothly. You may even have some of your own to add. Feel free to comment below and let us know what else would be on your list.

Ok, here it is!

1. Set up your Google calendar

Make sure your class times and meeting times are in for the year. This will make your scheduling so much easier when it comes to scheduling phone calls with parents, meetings with students, IEP meetings, or committee meetings. I know it's not super easy with our hybrid schedules but spending a moment to take care of it for the year now will save you so much time and frustration later. Trust me, I'm definitely speaking from experience!

2. Create a PAGE in Schoology that has your important information.

 (Before Open House!)

Once upon a time, we used to have handouts on parent night. These sheets of paper (which would often get lost or left behind) had important details such as how to reach me, when my free periods are, preferred method of communication, grading, etc. Now, you can simply go to your Schoology materials page and click Add Materials, then click to add a page. On that page you can enter all of the important information, class policies and your syllabus. Just in time for open house!

Image from Gyazo


3. Set up your grade settings for both semesters.

Just do them both now! You are not going to be in the mood to do this again in January. Plus, when you have one class set up, it's super easy to just copy to your other courses.Click here for the gradebook setup guide.  One important note: If you had last year's settings the way you want them for this year, you can just go to your archived course and copy the settings to your new classes! WooHoo!

4. Change the image tile and section name for your courses in Schoology. 

Go ahead and do both semesters now. Remember, you can change the section name but not the course name. When you are in a course, click under the image tile Course Options and click Edit Info. There you can change the section name. Hover over the image and you can click Edit Picture. But first, go to Google Draw, click File, Page Setup, and choose custom to set the image to 350X100 pixels. Then you can add an image from the internet, add text and color. When you have it the way you like it, click File, Download and download the jpeg. Go back to Schoology and attach that file. Changing that image changes what the students will see so choose wisely. If you want to use numbers to represent the class period, this folder has numbers already formatted.  Feel free to use them!

Image from Gyazo


5. Have a plan, and stick to it!

One of the things we're hearing from students is that technology integration works well when teachers are organized and articulate their organization system well in class. You have several options and there isn't really one "best" one. However, students can tell when you don't have one and then everyone struggles. Help yourself and your students by setting up your course in an organized manner. Need some inspiration? Here is an article describing 7 simple ways to set up your course. You will find that your students will be more independent and you will get so much more accomplished in class if everyone's on the same page.

Have a great school year! What else would you add to this list?
Go ahead and post in the comments below.  


Tuesday, May 28, 2019

 End of the semester Gradebook 

 With our first year of Schoology in the books, I am sure I can speak for all of the instructional tech/district tech teams, with how much we appreciate the good faith efforts our staff has put forth in learning Schoology. We all know how difficult it can be learning a brand new system, and we truly appreciate how patient and hard working the staff has been. With grades due next week, let's dive into what needs to be done to get grades right:

Quick Reminders/Dates:

  • IC/Schoology Blackout Dates - Monday, June 3rd (8:00 am) - Thursday, June 6th (4:00 pm)
  • Final Schoology Grade due before Sync - Thursday, June 6th (11:00 pm)
  • Final Grades in IC due - Friday, June 7th (10:30 am)
  • If your grades were up to date and finalized on Schoology during the last Schoology-to-IC Grade Sync, the only additional action in IC would be to enter Incompletes.
  • Make sure you publish all of your gradebook entries!

What's new:

While Schoology hosts our up-to-date, individual student grades, we still rely on Infinite Campus for the final grade reports. Initially, standards-based graders, curvers, and teachers looking to round certain grades, needed to wait for a "window" to open up, when the sync would stop so that they could go directly into Infinite Campus to input their grades. Our district tech team has found a way to open that window permanently. You can now go directly to Infinite Campus RIGHT NOW, and input your grades without fear of the Schoology/IC grade sync overriding those grades. 


How to set up/enter Final Exams?

Setting up a final exam can be tricky - here are some questions you should ask yourselves before you try:
  • Does your final exam "live" inside or outside of your semester grade?
    • for example, mine "lives" outside of my semester grade with a breakdown below
  • If so, you'll have to go to your Gradebook to create it. (Don't worry if it doesn't show up immediately. Just hit refresh)
  • Then go to Grade Setup to assign percent values. (Remember to hit save)

  • Do you have multiple parts to your final? Are they weighted as a percent, or by total points? Take a look at this Google Slides presentation for a deeper look into setting up finals.

Rounding choices: THSD 113 Rounded .5 vs Round Period/Final Grades

There are two methods to round grades automatically in Schoology. 
  • THSD 113 Rounded .5 - this method is what is most familiar to our staff. A student receiving an 89.5% will earn an "A" for the course, but the value will stay an 89.5%
  • Round Period/Final Grades - this is Schoology's native method. Every final value is rounded to the nearest percent. A student receiving an 89.5% will get a 90%, and a student receiving an 89.4% will get an 89%.
  • DON'T CHOOSE NUMERIC!!


Grade Changes and Comments:

  • If your student is on the edge of 2 grades and you'd like to manually change their grade, first you'll need to enable "Course Override Column" in the "Grade Setup" page. 
  • Notice below for Rich Grady - who was at an 89.45% B+. Because I wanted to bump him up to an A-, I wrote in 89.5% in the Overall (Override) column, which gave him the grade bump. 
  • If you want to give a student a grade bump, but do not want to change the % value, you can do that in IC through "Post Grades" (So Rich would keep the 89.45%, but still receive an A-)


  • To add optional comments, you merely need to hover over the "Overall" grade column until the blue chatbox appears. Click on it and type in your comment. 
  • Normally you'd need to click, "Display to Student" for students/parents to see your comments, but not for Semester Grade comments. 


Happy grading. Any questions? Feel free to contact our team! Dkim@dist113.org - Lberghoff@dist113.org


Monday, May 20, 2019

How To Wrap Up The Year  So You Will Be Ready To Start Up Again In The Fall. 

Top 5 Suggestions Schoology and Google

Your Future Self Will Thank You!

@LisaBerghoff/@MrKimDHS


I have been in education quite a long time. I love the end of the school year because when you have the whole summer in front of you, anything's possible. Many of us travel or participate in professional development, connect with friends, family, and colleagues in a very different way than during the school year. I no longer set the expectation that I will get tons of school work done over the summer. It often doesn't happen and if it does then once I meet my new students, I end up tossing many of those plans in the trash. One thing that I have learned however, is that there are a few things I can do for myself before the school year ends that makes the start of a new school year much easier.
For example, I always clean out the clutter from my desk. It's the last thing I want to do during the first week of June but if I do it then, I'm always happy when I return in August to find a clutter-free work space. 

There are even a few things you can do digitally  to help make life easier in the fall. 
Here are my top 5 suggestions.

1. Are you teaching the same course next year? Save your course to resources in Schoology!

You need to first create a "collection" in resources. Click on Resources. Then, click on the filing cabinet and create a new collection. Next, go to your course's materials page and click Options. Select "save to resources" and choose the new collection you created. 
When you return in the fall, you will just click Add Materials  and then choose "import from resources". 


Here is what it looks like when you create a collection in resources:


And here's what it looks like when you save your course to resources:

2. Not teaching the same course and want to hand over your materials to the teacher who is teaching the course next year?

Make sure to add that teacher as a connection. Click on the search icon (magnifying glass) and type in the teacher's name. Once they appear, click "add connection". After following the instructions from #1 above, you can now go to resources, click the collection where your course materials are located, click "share" and "connections" and select their name. 


3. Avoid any grade issues that you would have to fix later. Make sure all assignments are PUBLISHED!

Go to your course gradebook and use the bulk edit tool to make sure all of your assignments are published. This allows you to view all of your assignments at once. Check and make sure there is a check next to the publish button.Don't forget to save!


4. Check your grade setup because you can copy it and use it again next year!

Did you know that you can copy a grade setup from an archived course? It's true! If you have your categories weighted just right and your grade scale set just how you like it, you can copy the grade setup into your new courses next year! Now is the time to double and triple check your grade setup. If you get it right at this point, it will save you from needing to fix it when grades get synced over to Infinite Campus but it will also ensure that you can copy those settings for next year and it will be stress free!

5. Set your course schedule in your Google calendar as soon as you have it.

How difficult is it to schedule time to collaborate with colleagues? Did you know that if everyone's Google calendar is populated with their course schedule and meetings then it is actually very easy to find times to meet? Do this now! You won't want to do it in August and you will be SO glad you did. Even though our schedules are funky and not very regular, it is well worth the time and effort to make sure your calendar is correct. 
Not sure how to do it? Here is a short video:


5/13/19 Schoology Gradebook Mistakes/Misconceptions

Common Schoology Gradebook Mistakes to Avoid

@LisaBerghoff/@MrKimDHS

This is my 4th year at District 113, and with that, my once goofy little freshman rascals are now big bad seniors on the cusp of graduating. It's still weird seeing them in the hallway thinking, "wow, I cannot believe little Jimmy is going to college next year..." 

And with senior grade due dates upcoming, it's never too early to get our gradebooks in order. Here are some common Schoology Gradebook mistakes/misconceptions to look out for:

Category Calculations: Total Points vs. Percent


The Math department teachers were the ones (no surprise) who first discovered this mistake - when creating your categories, make sure you know the difference between Total Points and Percent. Many teachers, thinking this meant weighted vs. unweighted, chose "Percent" as their grading option. Here is the slight mathematical difference between the two grading styles. 

Let's say little Jimmy has two assessments, one worth 10 points, and one worth 100 points.

Percent:

  • 9/10 = 90%
  • 85/100 = 85%
  • =(90%+85%)/2 = 87.5%

Total Points:

  • 9/10 = 90%
  • 85/100 = 85%
  • =94/110 = 85.5%
The difference is subtle, but can be the difference can affect a lot of students. Be careful changing this setting deep into the semester, as it will change all of your student scores. 

Grading Scale:

This is a relatively simple fix, but important to remember: DO NOT USE NUMERIC as your gradebook scale. It will result in an error when grades are synced with Infinite Campus. You MUST use one of the provided scales. 

THSD 113 Rounded .5 vs. Round Period/Final Grades

There are two ways we can round your students' final grades - and by final we mean, the cumulative grade we see on the report card:

THSD 113 Rounded .5

This option should be a familiar one as it was the only method of rounding on Infinite Campus. Any grade above the .5 threshold will round up to the nearest letter grade. One caveat is that while the grade will round to the next letter grade, the numerical grade will stay the same

  • 89.6% is worth an A-, but the grade will still show an 89.6%

Round Period/Final Grades

This is Schoology's default rounding system. So essentially it will round any value to the nearest percent. So basically every grade in your class will have a rounded value.
  • 89.6% will turn into a 90%
  • 89.4% will turn into an 89%

Infinite Campus - Schoology Sync?

Just to explain how grades go from one system to the other, what happens is every night at around midnight, Schoology will begin dumping their raw data to Infinite Campus. It takes about 3-4 hours for everyone's grades to sync to Infinite Campus. So what do I have to do in Infinite Campus when grades are due?
  • Enter incompletes, drops, and other grading tasks.
  • While you can manually change the final grades in both systems, in Infinite Campus you can change the letter value without changing the numeric value. 
  • You can also enter final grade comments on both IC and in Schoology. 
Do you have any other thoughts on our Schoology Gradebook? Comment below!

Monday, May 6, 2019


Have Some Fun While Learning With Gimkit!


@LisaBerghoff/@MrKimDHS


I LOVE learning about new technology tools! I love figuring them out. I love thinking of different ways that kids can learn while using the tools. I love hearing the stories behind how they were created. I often get asked how I learn about new tools. I can't say that there is a one-way path to new online educational tools. Sometimes I learn from the blogs or podcasts I follow. Sometimes there is a buzz on Twitter. Sometimes another teacher brings it to my attention. This particular new one came from a call that I put out to my Google Innovator Academy cohort. I did a session during our professional development time on Wednesday called 30 Tools In 60 Minutes. It was really fun to put together and present. I had my list of 30 tools ready to go but decided to contact my cohort and see if they knew of any that I should add to the list. One of my buddies, Chris Young (@CYoungEdTech) mentioned Gimkit and that it was created by a high school student. I decided to check it out and I was hooked. I decided to try it out right away and it got rave reviews from all of my demo-ers.

So, if you love Kahoot, and who doesn't, really, I highly encourage you to check out Gimkit.  Created by high school student Josh Feinsilber of Seattle, Gikit removes some of the barriers that exist with Kahoot. For example, the question and answers are displayed on each student's screen, eliminating the need to be able to look, read, and transfer from the screen. Josh writes a blog about his journey with creating Gimkit and his future plans for the site. If you want to see what happens when high school students write for an authentic audience, check out his blog here


To Get Started, Go To Gimkit.com


Image from Gyazo

Here are the details you need to know:

  • Gimkit calls the games Kits. You can assign kits for homework, run them live in the classroom, or even have students collaborate and add questions to a kit. 
  • Gimkit "seasons" allows you to track student achievements over time. You can track for an individual game, student vs. student, or even class vs. class.
  • Students earn money as they answer questions correctly. If you allow it, their cash can be used to purchase power ups, or themes. You can also choose to allow only power ups that won't harm other players. 
  • You can import questions that you already have in Quizlet or in a csv file.
  • Once you create your game, your students go to Gimkit.com/play and enter the game code to play.
  • You can choose from 3 modes: students can play for a specific amount of time (ex. whoever has the most cash after 10 minutes wins), for a specific amount of cash (ex. first person to reach $10,000 wins), or all in (ex. the collective group needs to reach a certain amount of cash for the game to end). 
  • There is also a Team Mode, where students work together in groups.
  • The whole process is extremely simple and the site walks you through the steps to set it up. I was able to create a quick quiz for my class and have them actually playing it in just a few minutes.
  • After playing your game, you can access a really nice report that shows general stats, a breakdown by question and an individual report for each student. 

Gimkit is a winner when it comes to tools that encourage maximum engagement from all students.

Have you tried Gimkit? Let us know how it went. Want some help getting started? Let us know.