Monday, March 21, 2016


Maximize The Benefits Of YouTube, Minimize The Annoyances

@LisaBerghoff/@Joe_Edtech


It is so exciting to see how many teachers are taking advantage of YouTube in the classroom. According to Digital Stat Articles 2/14/2016, 82% of internet users aged 14-17 use YouTube. It makes sense that we would leverage this user- friendly, engaging, massive collection of videos for our students' benefit. There are endless possibilities when it comes to learning applications with video. As much as I love YouTube, there are a few minor inconveniences that can feel not so minor when you are in front of a room of 25 adolescents.  First of all, how often have you cued up an amazing video for your class but first you must awkwardly sit through a 15 second commercial?  I am usually just crossing  my fingers that it's an ad for something that is  age appropriate and extremely boring. Otherwise, guess what my students take away from the whole lesson?  That's right! All of that time I spent searching for the perfect video is completely wasted because of one 15 second ad.  Ok, here's another one.  The video is over, the students were completely amazed and are ready to discuss, apply, and extend what they have learned (work with me here) but YouTube shows an entire screen of additional videos that I may or may not want to show.  While we're at it, does anyone else find the strip of related videos down the side of the screen very distracting?

You get the point.
What's a teacher to do?

I have a few tools for you to try that are designed to eliminate these annoyances and maximize the benefits of video.

Adblock for YouTube 


This is a chrome extension which means it lives in the upper right corner of your chrome address bar. Little known fact, that chrome address bar is called the omnibox. There will be extra credit for anyone who uses the word omnibox in a sentence today. The Adblock for YouTube extension magically takes away those ads that automatically play before your actual video plays.


Quietube and Viewpure


Removing the video ads is wonderful but what Quietube and Viewpure do is absolutely amazing. These free tools eliminate the distractions such as suggested videos, comments, and ads.  When you go to Quietube's website you will be very underwhelmed. These are no frills tools that deliver on their promise to do a specific job. All you need to do on your end is drag the quietube button up to your bookmarks bar and when you are watching a video on YouTube, simply click the button.  You will get a clean screen with nothing but a viewing box showing your video.  Viewpure works very much the same way.  You can drag the "purify" button up to your bookmarks bar or insert the YouTube link into the space on the website and click "purify" to get the new link. Under the viewing box you can click to get a short link to share with your students so they too will only see the video.  You can put that link into Google classroom or whatever system you use to  share content with your class.  When your students click the link, they will view the video in quietube format.  You also have an option for a black background.  Here is a 35 second tutorial:


DF YouTube (Distraction Free) 


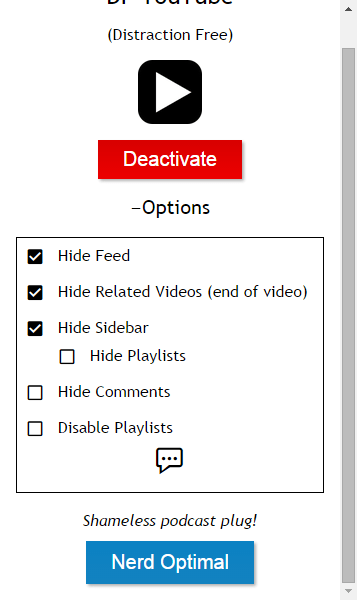
If you're still reading this post then your persistence will be rewarded. I have saved the best (in my opinion) for last.  DF YouTube is a chrome extension that takes away the ads, thumbnails, video recommendations grid that appears at the end of a video, comments, etc.  The extension makes all of these settings configurable!  You can click on the extension and click "options" to easily check or uncheck what items you would like to hide.  The one downside to DF YouTube that I can see is that it does not give you a link to share with your students.  This extension is perfect for displaying a video to a group.  If you are sharing a video with students and you want it to be without the distractions, I would suggest using Quietube or Viewpure.


As we continue on this journey of transforming education through the use of new tools and a new way of thinking about teaching and learning, I am confident that video will remain a fan favorite in our classrooms.
How are you using YouTube with your students?  Post in the comments below. I'd love to hear from you!

Tuesday, March 15, 2016

Image from Visualistan.com
Challenging Your Students to Support Their Arguments with Data

@joe_edtech / @LisaBerghoff


As I was planning this blog post I had to keep searching through my previously published topics. I couldn't believe that I hadn't written about infographics before - at least once. So this is long overdue.

The STEAM philosophy in education is not the preference for certain content areas in the curriculum - don't get hung up on the acronym. STEAM is about teaching our kids to think creatively, in an interdisciplinary way. Student created infographics is an easy way to integrate STEAM ideas in any content area. When kids make good infographics, they learn to construct a coherent argument, supported by graphical representations of both quantitative and qualitative data, designed in a way that is both pleasing and convincing.

Honestly, your students could make good infographics on their own using Google Docs or Microsoft Word, but there are some pretty decent infographic generators out there in the Web 2.0 world. The three that I've seen used most effectively in the classroom are Venngage, Visme, and infogr.am. All of them work pretty much the same way, and all of them have a few drawbacks. For instance, all of them fall into the category of free-ish. They all have premium versions that have far more features and options than the free for education versions, but they all have templates and examples to help your students as they work.

Venngage has actually added more features to its free products in the last year, so let's start there. Here is the short Venngage introduction to their product:


As you can see, there are many more templates available for the premium version, but there is plenty available with your free account.

Visme is another infographic generator that is easy to use and offers several templates for free, however, Visme only allows you to keep 3 infographics in your free account at any one time. infogr.am is not just an infographic generator. It also allows you to create maps and graphs. However, infogr.am is really built around its premium service. The "free" plan restricts users to 10 infographics, and also restricts the number of image uploads. 
------------------------------------------------------------------------------------------------------
Have you found other ways to create good infographics in the classroom? Please tell us about them in the comment box below.

Monday, March 7, 2016

What's The Best Tool For The Job? Blendspace Makes Blended Learning Effortless!

@LisaBerghoff/@Joe_EdTech


I get asked the following question at least once on a typical day: "If I'm going to use technology, can you teach me how to use the absolute best._______ ?" Go ahead and fill in the blank.  I'm often (but not always) hesitant to answer this question as many tools are more appropriate for some tasks while other tools are better suited for other tasks.  There is also the factor of personal preference that must be taken into account.  As busy teachers, we don't really have extra free time to spend learning how to use technology that we may or may not end up using.

That is why I am a huge fan of "blended learning", which is a mixture of face to face interaction along with web-based digital and media tools. There is no need to completely abandon those tried and true lessons that we know our students respond to.  There is also no need to constantly try to create something brand new.  The internet is a sea of rich resources that can be utilized for a huge range of teaching opportunities.  One issue however is that the internet  at times seems unwieldy because it can be endless and sorting out the quality from the crap can be tricky.

For those of you giving me a virtual high five right now, I'm happy to introduce you to Blendspace.  This free website and chrome app is there to help you create digital lessons in 5 minutes! It makes planning, building, and delivering lessons that integrate content straightforward and painless. You can create interactive, creative lessons with  some of the tools you are already using like YouTube, digital media, and your own files.  You can also take advantage of TES resources, which is a marketplace that helps teachers find free and paid online resources that are created by other teachers. and are available on Blendspace.  You can add a quick quiz, text, or bring in any files from your Google drive or your computer. 

Here is a 1- minute tour of Blendspace: 


Not sure you want to be creating digital lessons? How about having your students use Blendspace for digital storytelling, biographies,  or collaborative research projects? Students can use Blendspace for quiz and test review materials. Tired of slideshow presentations? Have your students use Blendspace to create an interactive presentation that will have everyone interested and engaged. Students can store their links, videos, pdfs, presentations and other digital content in an organized, interesting, and FREE way.

Want to see an example of a Blendspace lesson? Below is a lesson on magnetism that I created in less than 2 minutes.  Imagine what I could have produced in 5!  You can see that it has two powerpoint presentations, a worksheet, videos and images.  My students can access this resource at their own pace and I can easily track their progress.


Give Blendspace a try.

What are some of your favorite blended learning tools?  Post them in the comments section below.


Tuesday, March 1, 2016

Using Choosito! to Differentiate by Reading Level

@joe_edtech / @LisaBerghoff

Technology changes. Sometimes, I don't like the changes. But it happens and I learn to get over it. For instance, I have spent a lot of my time teaching people how to search well using Google's Advanced Search features - and one of the things I loved to teach about was sorting results by reading level. OK, Google didn't give you Lexile levels or anything like that, but the search engine used to categorize the results by Basic, Intermediate, or Advanced reading levels. Alas, Google giveth, and Google taketh away - reading levels are no longer available in Google's Advanced Search. 

However, Choosito! is a free Web2.0 tool that will allow you to search the web, and their curated library, and filter by both content and reading level. Here's a short video to help explain Choosito! a little better:


Once you create a free account and log in, you can go to Choosito! Search. Simply enter the topic as you would on Google, then choose your categories. What reading level do you want? Are you looking for that topic in Humanities or Business & Career? And are you searching the web, the Choosito! Library, or are you searching for a school safe image?
When you get your results, you get a little more than a link to a website. You get a preview of the page, the website "ranking" from other Choosito! users, and the ability to add the resource to your own curated page (click the "+"). Some of your resources may have an icon that looks like a little red schoolhouse. That means the resource has been vetted by a number of other teachers and librarians and added to the Choosito! library.
____________________________________________________________________________

If you've found other ways to get differentiated Internet search results, please tell us about them below.