Showing posts sorted by relevance for query schoology assessment. Sort by date Show all posts

Tuesday, October 22, 2019


Schoology Assessments

@LisaBerghoff/@MrKimDHS


I've been just a tad unwilling to write about online Schoology assessments because of some of the difficulties of online test security, extended time, technical logistics, and the cost/benefit analysis of online vs. pen and paper, but more and more teachers have been intrigued about the benefits of Schoology's Assessment capabilities, and honestly Schoology's program is quite good. So here we go: Online testing!

Fluid compatibility

Right off the start you'll see one of the major benefits of using Schoology assessments is how easily questions can be graded and transferred to your gradebook. Initially building an assessment will ask you to assign point values and categories for the transfer of information between your assessment and the gradebook. 


Now Schoology can instantly grade student responses and enter values into your gradebook, but that'll depend on the types of questions you are adding. Multiple choice questions are easily graded and transferred, but short answer/essay questions will need to wait for your input. Either way, student answers and teacher feedback is organized and locked into Schoology. 

Building test parameters


Schoology allows teachers some granular control over what the online assessment will look like:
  • Instructions to be displayed to students before the start
  • Time limits for taking the assessment
  • Randomly order questions
  • Show possible points for each question during an attempt
  • Can students use calculator, and if so is it basic or scientific?
    • Same question for rulers, and protractors
  • Can student eliminate choices for multiple choice?
  • Can students view results immediately after completion?
  • How many attempts can students submit?
And so on...most of your assessment queries can be answered in the Setup tab. 

Question Types


Question type - the menu of options is quite robust:

And each question type can be further fine-tuned and dialed in. Look for example the parameters for a multiple choice question:

Writing the question itself is simple and self-explanatory. You have direct control over how many options there are, the order, and full access to the text editor.


You can also shuffle answer choices, allow multiple responses, or even give partial credit to an alternate answer.


Grading 

You can grade by question, or by student, and doing so gives you a wealth of information such as:
  • The number of student attempts
  • Completion status
  • Last modified
  • Students' elapsed time for completion
Like we mentioned above, certain types of questions can be auto-graded by Schoology, and uploaded to your gradebook. Questions that require a direct look from the teacher will wait for teacher input before the grade is transferred over.

Miscellaneous

Once created you can do a number of things with your assessment for increased utility:
  • You can publish or unpublish your assessment
  • Copy the assessment to another course
  • Save to resources to share with another teacher
  • Print a physical copy

Test Security

This is the big one - how to ask students to take an assessment on their Chromebooks or laptops, but keep them from straying to another site, taking a screenshot, or printing the questions? 

Schoology has partnered with LockDown Browser to cover these concerns. By enabling LockDown Browser you can:

To activate lockdown browser, you must create the assessment first. Then on the left-hand side of your Schoology page, click on "LockDown Browser" to access the conditions above. 

Even with these safeguards, teachers are a bit hesitant to fully embrace online testing as a replacement for the traditional paper and pen. And that's OK. You really only want to adopt a tech option, only if it is a realistic improvement over traditional methods. Some teachers love the assessment option as a formative review, as opposed to a summative assessment. Do you use Schoology's assessment function? Let us know your thoughts below!


Tuesday, April 24, 2018

Lockdown Browser in Schoology 4/24

Test Security & the LockDown Browser in Schoology


@joe_edtech/@LisaBerghoff


Guest Post By Howard Citron, Phsyics Teacher and Instructional Tech Coach at DHS

In the blog post below, Howard explains that using the LockDown browser feature in Schoology, you can prevent students from opening new tabs or windows on their Chromebooks and enhance your online test security.

Assignments, discussions and grade books, OH MY! As I venture down the yellow brick road and continue meeting all of these fascinating Schoology features, I’ve decided to start giving assessments through Schoology. My favorite part assessments in Schoology? The LockDown Browser, of course!

Have you wondered, how too can I use Schoology to give assessments without my students being able to access the internet for answers? That is the question we are here to answer.

We present to you the “LockDown Browser” embedded within Schoology! The LockDown Browser allows for you to create and give your students digital assessments with varying question types without the students being able to access the internet. This is a similar feature to using Hapara to lock out student browsing capabilities or the “Click to test” function through Mastery Manager without students having to log out of their Chromebooks.

First, you’ll want to activate the LockDown Browser in the lefthand side of your Schoology “Courses” page


Once the LockDown Browser has been activated FOR EACH CLASS, you have the ability to add it to any of your Schoology given assessments. Students will only have the ability to access webpages that you allow during assessments when LockDown is active.

To create an assessment using the LockDown Browser you will create an assessment (Test/Quiz) via “Gradebook” or “Add Materials.”

Upon creation of the assessment, you may set it up to either make the grades available without a key, with a key or not make the grades available once they have submitted the assessment.


Once you have created an assessment (Test/Quiz) within Schoology, you will have the following options presented to you for that assessment:
  1. Allowing the students into the exam only 
  2. Allowing the students into specified web sites 
  3. Allow iPad assessments 
  4. Allowing calculator function 
  5. Enable Printing
When the students log-in to the take the Schoology created assessment, they will be prompted to enter the LockDown Browser.

The LockDown Browser is an excellent tool that allows our students to enter into a testing mode without logging out of their system and provides the instructor the piece of mind to know that their students cannot access the internet while being assessed.

The accompanying data collection is also an incredible benefit of Schoology that we will discuss in a future blog.

Tuesday, May 16, 2023


 Let's Wrap Up The Year!

 Schoology/IC Checklist (May 2023)

New IC-Schoology Sync Regime

OK, year one of the Manual IC-Schoology sync is drawing to a close. Hopefully, by this point, we've taken our licks and figured out most of the sync issues, and are ready to finalize our gradebooks. There's nothing quite like being able to click "POST" and close out all of your tabs at the end of a semester. So to get there, where do we start?

STEP ONE: Sync Verification

Make sure that your scores in Infinite Campus match the scores you see in your Schoology Gradebook. If there are discrepancies between these two scores, here's what you should do:
  • Check Infinite Campus Grade Calculations. Category percentages, Weighted Grades, and Final Exam information need to be identical between IC and Schoology. Here are the updated instructions.
  • Make sure you are SYNCED in Schoology. It's the easiest mistake to make. Click on the Infinite Campus button in Schoology.


STEP TWO: Entering Final Exams/Projects

Do you have a final exam that lives outside the in-progress semester grade? 
For example, here is a breakdown of how my semester grade is calculated.

 Two Options- Enter In Schoology And Sync Or Enter Directly Into IC
   
For either option, do this first:
  • Go to your IC gradebook and click on Settings -> Grade Calc Options and make sure it is set to calculate correctly. As an example, here is what mine looks like.

Option 1: Enter in Schoology and then sync to IC
  • Enter your assessment/assignment in Schoology. DO NOT click the box that says "Set As Midterm/Final". Just make sure your grading task is set to Final Assessment. You can enter multiple parts to your final. As you enter each part, just make sure the Final Assessment grading task is chosen. 

  • Enter the grades and click on the sync button to move over to IC. You should be able to see those grades appear in the Final Assessment task in Infinite Campus.

Option 2: Enter directly into the Infinite Campus grade book
  •  In Infinite Campus go to your grade book, choose a section, and then choose Final Assessment as the grading task.
  • Click Add (top left, above settings) and then enter the details for your final. If you have a final with multiple parts, you can click Add and enter as many parts as you need.
  • Click Save or click Add Sections to add it to other course sections.
  • Enter the grades in the IC grade book and click Save.

STEP THREE: Finalize, Post, and Save Your Grades.

  • Take a look and make sure the grades look accurate. Go to your Infinite Campus grade book and select a section. Choose the Semester grading task. 
  • Go to Grade Book.  Under the Semester task, click the orange "Post" in the "In-Progress" column.  After you click "Post", a window will open to the right to confirm details.  Make sure you are posting to the Semester Task and click OK.  This will put all grades in the "Posted" column.  Lastly, make sure to click "Save", which will turn orange from grey after you post.  Repeat for every section.

  • IF YOU NEED TO MAKE ADJUSTMENTS TO THE GRADE: You will do that in the Posted Column and then click SAVE. 
And that's that? Hopefully, there are fewer issues this time around. As always, let us know if you have any questions or need additional help!


Monday, September 20, 2021


Using LockDown Browser With Assessments In Schoology (Updated 09/21)

@LisaBerghoff\@MrKimDHS


Since the beginning of time, teachers have been searching for ways to prevent their student from cheating. This is not a new phenomena.  I went to school in the 80s. The only technology we had was a basic calculator. And yet, we found ways to cheat.  With the increased use and availability of technology,  combined with the increased pressure on students to do well, there are increased opportunities for dishonest behavior. 

While this post is about a specific tool that we have to help combat cheating, I wanted to first take a moment to discuss some additional measures that are not technology related that may actually have a greater impact on curbing cheating. I have not done the research on this but I might have to because it's fascinating, and also because I really do think I'm onto something here.

1. Know Your Students- And Do A Little Show And Tell

If you take the time to get to know your students, establish relationships with them, and talk with them about the importance of academic honesty, they will be less likely to cheat. Explain very clearly what constitutes cheating and what the consequences are. It may seem obvious, but sometimes just bringing it up helps students to rethink their behavior. Give examples and stories of some of the things you have seen to let them know that you take academic dishonesty seriously. 

2. Give Them Time and Tools

Students who are well prepared don't need to cheat. Especially this early in the school year, you should feel comfortable to let your students know when an assessment is coming. You should also include information about how to prepare for the assessment. Again, don't assume that they know. They are navigating many teachers, personalities, and policies. Throw them a bone and let them come into the assessment feeling more confident in themselves than in their classmates.

3. Rethink The Types Of Assessments You Give

I know this is a hot button item and I am not saying to redo all of your assessments. I am simply asking you to consider the types of assessments you give and whether or not they are more or less conducive to cheating. For example, have you been giving the same assessment for the past 4 years? 6 years? 8 years? This is a great time to do an audit of your assessments. See what needs to be updated, changed, or adjusted. Also, you can consider the stakes. If an assessment is high stakes, there will be greater likelihood that students will cheat. I spoke to one teacher who genuinely just wanted to know what her students knew at the end of a unit. She gave an assessment but told her students the grade would not go in the gradebook. There was no reason for those students to cheat and she got the data she needed to continue planning her lessons.

Thanks for listening! Now, let's learn about Lockdown Browser.
You may have used Lockdown Browser before and if you have, keep reading because the way students access it has changed. If you have not used Lockdown Browser, it is an extension that works with Schoology so that when enabled, a student cannot open any new tabs, navigate away from the assessment, take screenshots, etc. It essentially locks the student into the testing environment. Here's how it works.


In Schoology, after you have created your assessment, navigate to where it says Lockdown Browser on the left side of the screen.


When you click LockDown Browser you will get a screen that has an introduction, resources, video tutorials, guides and support. It even has instructions for students.


When you click Continue To LockDown Browser you will see all of your assessments. Click on one to enable by choosing settings.


From here you can choose to require LockDown Browser and set the settings how you want them. I highly recommend clicking where it says "explain" next to each option as it can have a big impact on your students' experience.

Here is what is new!
For students, they will go to Schoology and click on the assessment, then they will click the LockDown Browser extension. They no longer need to shut down their chromebooks. The extension has already been added for them. 

If you are new to using LockDown Browser I highly suggest making a practice assessment to try it out with your classes first. Students may be stressed about taking an assessment and using LockDown Browser for the first time is probably not going to help. Remove this barrier by giving them experience with the tool before it matters. Make a 2 question quiz and ask something silly. Then enable LockDown Browser and have them test it out so you can work out any bugs beforehand.

As always, we are here to help!


Tuesday, March 13, 2018


Creating Assessments In Schoology

@LisaBerghoff/@Joe_Edtech


As educators, we are constantly assessing our students.
In the 22 years that I have been in district 113,
the word assessment has come up so many times and in so many settings
that it is evident that it is critical to what we do. We need to be doing ongoing
assessments to adjust our teaching, to determine how and when to
differentiate for our students, to help give feedback and communicate
how our students are progressing. To many, the word assessment means “test”
and sometimes that is true. It is a tool that has to do with how we evaluate our
students’ learning and alter our teaching.
As I continue to work with teachers in each subject area, I can see that teachers
give assessments in so many different forms, shapes, and sizes. Fortunately,
Schoology can handle the wide variety of options and has robust tools to suit many
different needs. Here are the basic steps to get you started.

Start off in your course, sandbox course, or resources. If you are going to use
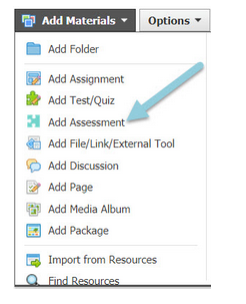
the assessment right away, go ahead and start in your current course. Click Add Materials
and then go to Add Assessment.


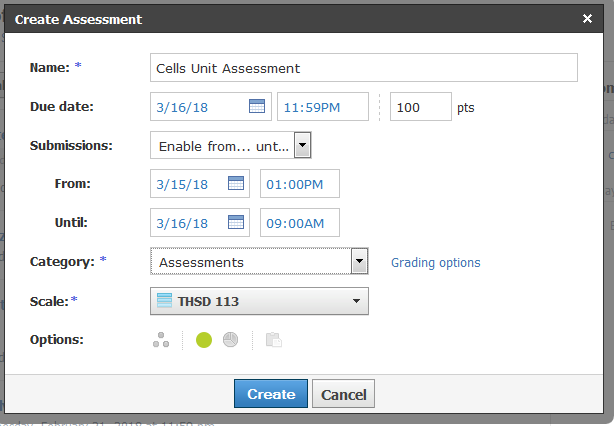
A box will pop up prompting you to name the assessment and set some parameters,
such as when it will be available to students, points, category, etc. Here is one that
I am currently creating for Biology Survey.


After you click the blue Create button, you will be on the Set Up page.
This is where you can enter instructions that the students will see. You also have
many settings to choose from including if you want there to be a time limit, if you
want students to be able to go back and edit their answers before submitting,
and if you want questions to be randomly ordered.

Then, click Questions to begin writing assessment questions. You have the typical
options such as multiple choice, true/false, and fill in the blank; but you also have
some interesting choices like label an image, drag and drop, and highlight hotspot.

As you create questions, you will also enter the correct answer and give certain
parameters at the question level. For example, you can have the options in a
multiple choice question shuffle for each student. When you are done with the
question, you can click Preview Question to see how it will look to your students.  
When you have it looking the way you want, click the blue save button.

To see an overview of all of the assessment question types, check out the

Once you publish to your students, you will be able to see all of the data right
there on the same screen by clicking Student Attempts. No need to enter grades
into the Schoology gradebook or calendar, when you publish to your students it will
show up there automatically.

Have you experimented with assessments in Schoology?
Come and join a pd session or a lunch and learn and share what you have done!

Monday, October 20, 2025

Lock In Your Assessment And Assignment Security With LockDown Browser

@LisaBerghoff


"It was the best of times, it was the worst of times." I read A Tale Of Two Cities when I was in high school. It was required reading. I didn't love it. I also didn't really understand most of it until I decided to reread it as an adult. While we are not experiencing the French Revolution, we are certainly experiencing a time of contradictions in education. We have new AI tools coming at us at a frantic speed while also understanding the need for our students to have their own thoughts, ideas, and understanding of the new content they are learning. We want to be innovative, to encourage utilizing resources and maximizing what we have at our fingertips, while also clinging to our own experiences of teaching and learning. 
This duality can be frustrating when we need to plan for a group of eager and not so eager students in our classrooms everyday. Here is a perfect opportunity to practice dialectical thinking, a way of accepting that two things can be true at the same time, even when they seem to contradict one another.

I generally intend for this blog to push the boundaries and promote innovation and newness. Today, I'm pulling it back a bit to highlight a tool that I first wrote about in 2018 and haven't highlighted since 2021. I'm excited to share information about LockDown Browser in Schoology. 

What Is LockDown Browser?

LockDown Browser is a custom browser that integrates with Schoology to lock down a testing or assignment environment, preventing students from accessing other applications, websites, or files. When lockdown browser is enabled, students are unable to print, copy, visit other websites, access other applications, or close an assessment or assignment until it has been submitted. I say assessments AND assignments but in Schoology, it only works with the assessment tool on your materials page. However, you can use those assessments as assignments whenever you want, it's really a matter of semantics.

How Does LockDown Browser Work?

Step 1: Create your assessment in Schoology and deploy it to your course.
Step 2: Select the LockDown Browser dashboard on the left side menu of Schoology. You will see a list of your assessments. Here is where you can configure the LockDown Browser settings. 
Step 3: Have students click on the assessment. LockDown Browser will launch automatically.
Within LockDown Browser, there is a getting started guide, video tutorials, as well as guides and support. 
Here is the dashboard:


It is HIGHLY recommended that you have students use their school-issued chromebooks when using LockDown Browser. If you allow students to use their own devices, they will need to download the program. 


There are several options within LockDown Browser. If the choices seem confusing, just hover your mouse over them and an explanation will appear. 

Here is an introductory video for students that explains what they need to do.


I have many thoughts on students cheating. I have thoughts on why they cheat, how they cheat, and what would get them to stop cheating. I welcome any conversation about this topic. Until we have some sort of a solution, it's good to know we have LockDown Browser. The fact that it is embedded within Schoology makes it even more secure and easier to use.
Want some help getting started?
Just let me know. I am always happy to help.


Monday, April 17, 2023


Mix It Up With Different Question Types In Schoology Assessments


@LisaBerghoff/@MrKimDHS


 It is getting to be that time of year when we focus on end of the year assessments. The whole notion of "show us what you know" often is in direct opposition to teachers' needing a quick way to grade because we want to get that grade book signed sealed and delivered in time for us to go on summer break. Would I ideally like to sit with every single student and have them go through their growth and progress on all of our learning targets? Absolutely. Unfortunately our schedule does not allow for that and so we are forced into other means of assessing student learning. According to Rick Stiggins, high quality assessment must satisfy five specific quality standards: 1. Clear Targets, 2. Focused Purpose, 3. Proper Method, 4. Sound Sampling, and 5. Accurate Assessment Free Of Bias and Distortion. 

As you are crafting your summative assessments, I thought it would be helpful to bring back into focus some of the assessment features that can be found baked into Schoology, our learning management system.  These features help customize your assessments to go beyond the typical multiple choice and true/false test. There are also lots of options within the setup that can help personalize the experience so you can get the best out of your students. As we know from the TPACK framework, many parts need to come together in order to best integrate technology in our classrooms. With your knowledge of the content and pedagogy combined with how well you know your students, you can utilize technology to effectively assess your students in a way that hits all five of Rick Stiggins' benchmarks for high quality assessments. 

Let's Get Into It:

The Setup-

When you click to add an assessment to your class, you will see the instructions box on the setup page. This box is often overlooked and I would encourage you to use it. Here, you have a rich text editor menu that allows you to add images or other media, links, and tables. You can also bold, highlight, and change the color of your fonts in order to draw attention to specific text. You can choose how you want to set the tone for your assessment. This is a spot where you can remind students of often missed details, and offer words of encouragement.

In the assessment toolbar you can allow students to flag questions so they can go back and review them before they submit. You can also allow them to eliminate answer choices if you do have multiple choice questions on your test.

Question Types-

There are 18 different types of assessment questions you can choose from. I am going to highlight the 5 that I think are most interactive and get kids to demonstrate their learning in different ways. 

1. Label Image

Upload an image and have your students label it by dragging and dropping from a list of potential answers. This can be a wonderful option for timelines, labeling models, cycles, or systems, describing parts of a work of art, or parts of an equation. Here are detailed instructions for using Label Image questions in Schoology, including how to align learning objectives. 


2. Highlight Hotspot

Upload an image and have your students identify an area or region that is determined by you. Use this option with maps, geometric shapes, data charts, scientific diagrams,vocabulary questions, and more. Here is an example using basic Spanish vocabulary. Here are instructions for using Highlight Hotspot. 


3. Chart

This question type enables students to review, create, or manipulate different kinds of charts in response to a question.  I actually recently saw a teacher use this as a self reflection tool which really appealed to me. I created one for an instrumental performance. I uploaded an image of the rubric so the students can refer to it. Then, I set the parameters so students can interact with the chart. They can assess themselves using the chart and then write or record a reflection explaining why they chose what they did. You can see lots of ways this would apply to your class. Here are detailed instructions for using the Chart question type. 


4. Highlight Image

This question type offers so much more than the name implies. Upload an image and your students are given multiple color options to highlight the image. But they don't need to only highlight. You can use this as a drawing tool as well. Since many of our students have touch screen chromebooks, this can be a fantastic option for marking text, circling or drawing arrows for vocabulary. My example below shows how to use the Highlight Image question for graphing in math or science. The image that I uploaded is just a basic graph. Once you create one question of this type, you can easily duplicate it and just change the equations.


5. Audio/Video 

I often have students who don't do well on a test or a quiz just come in and tell me what they know. It's remarkable to see the difference when they can just talk to me. While I can't do that with every student in person, I can have them respond to an audio or video question. You can upload an image or other media to add to your question prompt. The students then click to record their audio or video, depending on the question type. It's very easy to listen or watch once they submit.


Are you ready to start exploring the various options within Schoology assessments? Want some help getting started? Send an email and I'm happy to partner with you!


Monday, April 15, 2024

Accessibility Features 

(For EVERYONE) 

In Schoology


@LisaBerghoff


Some of you are familiar with Universal Design For Learning. I found the UDL framework from CAST about the same time I became interested in Design Thinking and the intersection of the two led me to believe that much of the way I thought about teaching students who struggle with learning was just plain wrong. In case you're new here, let me catch you up. Universal Design For Learning is a framework, based in neuroscience, that emphasizes the need for options for students in the areas of engagement, action and expression, and representation. The UDL guidelines 3.0 are being unveiled in July of 2024 and I am so excited to see the updated version. To see the current version, click here. The basic gist is that as educators our job is to try to remove barriers to student learning by providing multiple means for students to be engaged, take in information, and show what they know. Universal Design is a design principle that states that environments should be accessed and understood by all. 

It is through these ideas that I have come to understand that when we design for the edges, everyone benefits. Accessibility tools may be created for people with specific disabilities, but by allowing everyone to use them, there will be advantages for all. 

With spring assessments coming up, this seemed like a good time to take a look at the accessibility features found within Schoology.


1. Immersive Reader

Immersive Reader is built in to all Schoology assignments, pages, and discussion boards. It rolled out a few years ago but it's kind of incredible to me how few people have actually clicked on it. When you open immersive reader, you will notice that the text loads in a dyslexic friendly font. You have the ability to have the text read to you, and of course the ability to adjust the reading settings, including the reader speed and voice. In addition, you can have the text translated into many languages. You can also have the syllables separated and the parts of speech color coded. There is also a line focus feature which only shows a small amount of text on the screen and a picture dictionary. 

Here is what it looks and sounds like:


Check out the other features here:


2. Accessibility Checker
In case accessibility is not in the forefront of you mind at all times, there is a built in accessibility checker that will help you make sure your content is accessibility friendly.
When you are in the editor, just click on the accessibility icon and it will walk you through any issues you may have and what to do to rectify them. Take a look at how it works:


3. Assessment Settings
The assessment toolbar settings can offer many options to students that can help keep them on task and lower anxiety. As the teacher, you need to adjust the settings to make these features available. 
Allow students to be able to flag questions so they can go back and review them later.
Allow students to eliminate answer choices in multiple choice questions.
Allow for the use of a calculator, ruler, or protractor.
Allow students to highlight text.
Provide a notepad for students. 


4. Create Pop-Up Content In Assessment Questions:
Did you know that you can add pop-up content in your assessments? Help your students help themselves by including clarifying information for them. If a student asked you during the assessment, you would answer, so why not provide it to all and let them click instead of calling you over for help. When you are editing your question, highlight some text and then click the icon to add pop-up content. You can then type in clarifying text or you can even add an image. Click on preview to see how the question appears to students. Here is what it looks like when it's done.


5. Allow Students To Submit In Text, Audio, Or Video. 
Discussion questions are a wonderful way to continue the sense of community you create in the classroom. It can also give opportunities for students to participate in ways that they might not when you are in class together. When you create a discussion question in Schoology, all students have an equal opportunity to share and be heard. Students can respond to Schoology discussion prompts by typing text, recording audio, or recording video. What is nice is that the recordings happen right in Schoology so there's no saving, downloading, or uploading to do. You and your students can also respond to each other in the same manner. All your students need is permission from you to give it a try.
When you click in the discussion box to respond, all you need to do is click on the microphone icon. 

Then, choose the recording type.


Click to begin recording.


Click again to stop recording and then choose insert audio/video. If you don't like it, you can always rerecord.
By allowing students to choose the mode in which they respond, you can make your online discussions more accessible to all students.


Ok, these are my top five favorites. Which ones do you love that I missed? Which ones will you try? Want some help? I'm here for you!